
Installing Play Equipment at Home – Comprehensive Guide
Introduction
In today’s world, where technology plays a major role in children’s lives, creating a space for physical play at home has become more important than ever. Installing play equipment indoors or outdoors provides children with opportunities for movement, energy release, and holistic development.
This comprehensive guide covers the benefits, selection steps, installation process, safety tips, and maintenance of home play equipment—helping you make the best decisions for your children.
Chapter 1: Why Is Play at Home Important?
1.1 The Impact of Play on Child Development
Play is a vital activity for healthy child development. Its effects include:
- Physical development: Strengthens muscles, improves balance and coordination
- Cognitive growth: Enhances focus, creativity, and problem-solving
- Mental health: Reduces stress and anxiety
- Social skills: Teaches turn-taking, cooperation, and empathy
1.2 Advantages of Creating a Play Area at Home
- Increased safety: More control over the play environment compared to public parks
- Always accessible: Children can play anytime
- Saves time and money on travel
- Promotes family interaction and bonding
Installing Play Equipment at Home –Comprehensive Guide

Chapter 2: Types of Home Play Equipment
2.1 Indoor Play Equipment
Perfect for limited space or bad weather conditions:
- Mini slides and swings: Installable in a child’s bedroom or living room
- Indoor climbing walls: Build balance and muscle strength
- Small trampolines: Great for energy release in compact spaces
- Tunnels and play tents: Ideal for imaginative play
- Balance tools: Like balance boards or ladder walls
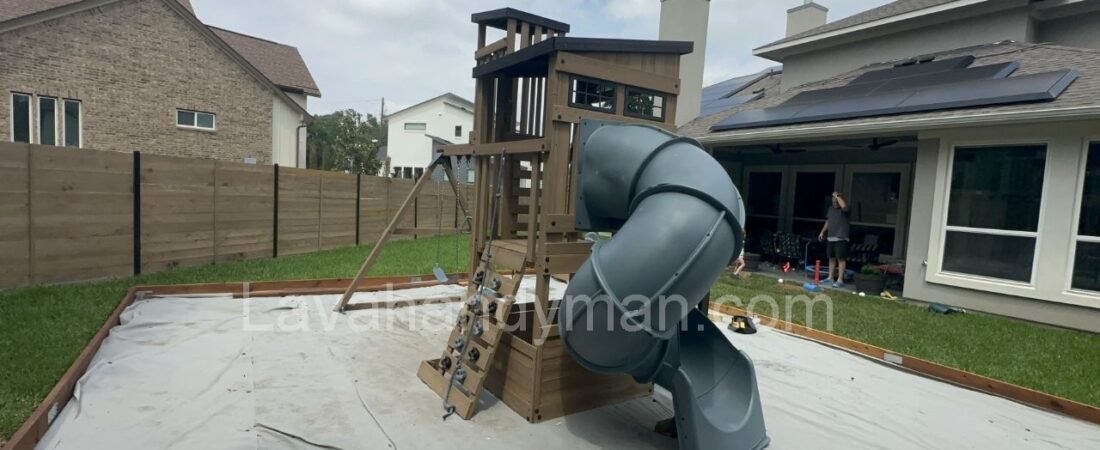
2.2 Outdoor Play Equipment (Yard or Rooftop)
If you have access to outdoor space:
- Large swing and slide sets
- Kids’ playhouses or castles
- Climbing walls and hanging ropes
- Safety flooring or artificial grass
- Mini football or basketball courts
Installing Play Equipment at Home –Comprehensive Guide
Chapter 3: Steps for Choosing and Installing Play Equipment
3.1 Assessing the Space
Before buying equipment, evaluate:
- Size and layout of the area
- Type of flooring (tile, grass, concrete, etc.)
- Lighting, ventilation, and safe access
- Any nearby obstacles or hazards
3.2 Choosing Age-Appropriate Equipment
Tips for better selection:
- Child’s age and ability: For example, toddlers should avoid tall structures
- Material: Lightweight plastic for toddlers; durable metal or wood for older kids
- Ease of mobility and storage
- Certified safety and quality standards
3.3 Preparing the Installation Site
- Ensure level ground or surface
- Create enough clearance around equipment to avoid collisions
- Install soft flooring (foam mats, rubber tiles, or artificial turf)
3.4 Installation Process
- Carefully read the instruction manual
- Use proper tools (drill, screwdriver, wrench, etc.)
- Secure all joints and fasteners tightly
- Test everything before allowing children to play
Chapter 4: Essential Safety Tips for Play Equipment
4.1 General Safety Advice
- Children should never use equipment unsupervised
- Regularly inspect and tighten bolts and fasteners
- Ensure all surfaces are smooth and free of sharp edges
4.2 Indoor Safety
- Keep fragile or electronic items away from play areas
- Use corner protectors and soft flooring
- Choose lighter equipment to prevent injury
4.3 Outdoor Safety
- Anchor equipment securely to prevent tipping in strong wind
- Keep equipment away from walls, fences, or hard surfaces
- Apply waterproof coatings or rust-resistant paint to metal parts
Chapter 5: Benefits of Home Play Equipment
5.1 Improved Health and Physical Activity
Active kids sleep better, focus more in school, and enjoy healthier growth overall.
5.2 Strengthened Family Relationships
Family participation in playtime promotes bonding and quality time.
5.3 Boosting Independence, Confidence, and Creativity
A personal play space encourages ownership, freedom, and imaginative exploration.
5.4 Long-Term Cost Savings
With permanent home equipment, parents save on travel, entry fees, and subscriptions to kids’ clubs or activity centers.
Chapter 6: Maintenance, Repairs, and Cleaning
6.1 Regular Inspections
Inspect every 2–4 weeks:
- Check tightness of all bolts and screws
- Look for cracks, wear, or breakage
- Monitor for signs of rust or rot
6.2 Cleaning and Hygiene
- Clean plastic or metal parts with soft detergent
- Disinfect frequently touched surfaces
- Prevent dust, leaves, or water accumulation outdoors
6.3 Seasonal Maintenance
- Cover or store equipment during heavy rain or snow
- Lubricate moving parts to avoid squeaks and wear
- Replace worn ropes, fabric parts, or safety nets

🔧 Tools Needed for Installing Play Equipment at Home
Installing play equipment in indoor or outdoor spaces requires the right set of tools. Using appropriate tools ensures faster installation, better safety, and higher quality results. Below is a practical list of essential and optional tools commonly used for assembling home play structures.
🛠 Essential Tools
1. Drill (Electric or Cordless)
- For drilling holes in walls, floors, wood, or metal parts
- Used to mount screws, wall plugs, or anchors
2. Screwdriver (Manual or Electric)
- Tightens screws during assembly
- Cordless screwdrivers speed up large installations
3. Allen Wrench & Adjustable Wrench
- For assembling equipment with bolts and nuts
- Allen keys are especially useful for pre-fabricated sets like swings or slides
4. Level (Bubble or Laser)
- Ensures play structures are even and balanced
- Improves both safety and appearance
5. Measuring Tape
- Measures floor space, distances, and alignment accurately
- Helps in correct equipment positioning
6. Hammer (Regular or Rubber)
- For securing pegs or lightly tapping parts into place
- Rubber hammers prevent damage to plastic or delicate parts
7. Utility Knife or Heavy-Duty Scissors
- For cutting ropes, foam, or packaging materials
- Useful for trimming foam mats or artificial turf
🧰 Additional Useful Tools
8. Sandpaper or Hand File
- Smooths wooden edges and removes splinters
- Enhances safety by preventing cuts or scratches
9. Pliers or Needle-Nose Pliers
- For gripping small parts, cables, or wires
- Ideal for handling chains or rope-based features
10. Ladder or Stable Step Stool
- Necessary for installing ceiling-mounted swings or wall fixtures
- Choose ladders with anti-slip bases for added safety
⚙ Specialized Tools (Optional)
These are more suited for large or permanent installations, especially outdoors or for professional setups:
| Tool | Purpose |
|---|---|
| Electric Impact Driver | Speeds up installation of heavy-duty screws |
| Welding Machine or Nail Gun | Used in permanent wooden or metal structures (e.g., climbing walls) |
| Pressure Washer or Steamer | Cleans outdoor surfaces before installation |
| Foam/Rubber Flooring Tools | For precise laying of soft safety flooring under play equipment |
✅ Final Tips for Using Tools Safely
Use the right tool for the job: Improper tools can damage parts or reduce equipment safety
Wear safety gear: Gloves, safety glasses, and proper footwear are recommended
Read the instruction manual: Each playset often comes with unique assembly guides
🔧 Comparison of Tools for Installing Play Equipment at Home
Installing play equipment at home—whether indoors or outdoors—requires a variety of tools depending on the space, type of structure (prefabricated, wooden, metal, or plastic), and the level of permanence. Below is a comprehensive comparison table that outlines the tools, their usage, advantages, and limitations.
🧰 Tool Comparison Table
| Tool | Primary Use | Best for | Advantages | Limitations |
|---|---|---|---|---|
| Drill (Electric or Cordless) | Drilling into walls, floors, wood, or metal | Indoor & outdoor | Fast, strong installation for heavy screws | Requires safety precautions and some skill |
| Screwdriver (Manual or Electric) | Tightening and loosening screws | Both | Lightweight, simple, ideal for basic setups | Slower in manual type, limited torque |
| Allen/Adjustable Wrench | Assembling bolts and hex screws | Mostly prefabricated sets | Common for DIY kits, easy to use | Not suitable for permanent installations |
| Level (Bubble or Laser) | Ensuring balance and even alignment | All setups | Increases safety and stability | Requires precision to use properly |
| Measuring Tape | Measuring dimensions and positioning | Both | Essential for accurate layout | May require assistance in larger areas |
| Hammer (Standard or Rubber) | Securing stakes or light wooden parts | Mostly outdoor | Simple and versatile tool | May damage delicate materials if not used carefully |
| Utility Knife / Heavy Scissors | Cutting rope, foam, turf, or packaging | Both | Clean cuts, useful for final adjustments | Requires caution to avoid injury |
| Sandpaper / Hand File | Smoothing wooden or sharp edges | Mostly indoor wood surfaces | Enhances child safety by removing splinters | Time-consuming for large or rough surfaces |
| Pliers / Needle-Nose Pliers | Gripping, bending wires or chains | Both | Helpful for adjustable or movable components | Limited for large-scale installations |
| Ladder / Step Stool | Accessing high areas like ceiling swings | Mostly indoor | Safe reach for elevated components | Needs flat and stable ground |
| Electric Screwdriver / Impact Driver | Fastening multiple or large screws | Larger or permanent setups | Time-saving, powerful for heavy-duty work | More expensive, may require user experience |
| Welding Machine / Nail Gun | Permanent joining of metal or wooden parts | Outdoor or fixed structures | Strong, durable attachment for custom-built frames | Requires expertise and safety equipment |
| Pressure Washer / Steam Cleaner | Cleaning surfaces before installation | Outdoor areas | Improves hygiene and surface prep | Best for larger outdoor projects |
✅ Practical Summary
| Installation Need | Recommended Tools |
|---|---|
| Light & prefabricated equipment | Screwdriver, Allen key, tape measure, level, utility knife |
| Permanent or professional installations | Drill, electric driver, laser level, welding/nail gun |
| Outdoor setups with dust or moisture | Weatherproof tools, pressure washer, turf/foam layer tools |
| Child safety and surface finishing | Sandpaper, rubber hammer, corner guards, soft flooring |
| Small spaces or apartments | Compact and quiet tools: cordless screwdriver, foldable ladder, Allen wrench |
Final Recommendations:
- Always prioritize safety over appearance or price
- Buy from reputable brands with warranties
- Let your child help in selecting or designing the space
- Use multi-purpose or foldable equipment to save space
📞 Need Help?
Let us take care of the hard work while you sit back and relax.
📍 Serving: Austin, Round Rock, Cedar Park & more
📱 Call or Text: (737) 420-6992
🌐 Visit: https://lavahandyman.com
