Professional Guide to Installing Decorative Mirrors on Walls Using a Laser Level for Accurate, Clean, and Perfect Results
Installing decorative mirrors using a laser level is one of the most effective ways to achieve accurate alignment, consistent spacing, and a professional finish in modern interior design. Whether you are installing decorative wall mirrors in a living room, bedroom, hallway, office, or commercial space, proper measuring and mounting techniques are essential for creating a clean and visually balanced result.
Decorative mirrors can transform an ordinary wall into an elegant feature by reflecting light, enhancing the appearance of a room, and creating a greater sense of space. However, even high-quality mirrors can look unprofessional when they are installed at the wrong height, positioned unevenly, or separated by inconsistent gaps. Using a laser level for mirror installation helps reduce these problems by providing clear horizontal and vertical reference lines throughout the project.
In this comprehensive guide, you will learn how to install decorative mirrors on walls using a laser level, prepare the installation surface, measure mirror positions, select the right mounting hardware, and achieve precise alignment. You will also discover professional mirror installation tips, common mistakes to avoid, and essential safety practices for achieving a durable and attractive result.
Installing Decorative Mirrors on Walls
Why Use a Laser Level for Decorative Mirror Installation?
A laser level is an essential tool for many professional wall installation projects. Unlike traditional measuring methods that require repeated measurements and visual estimates, a laser level projects a reference line that helps maintain consistent positioning across the installation area.
When installing decorative mirrors, this accuracy becomes especially important because glass surfaces reflect surrounding architectural lines, furniture, windows, and lighting fixtures. Even a small alignment error can become noticeable when several mirrors are installed together.
Installing Decorative Mirrors on Walls
Accurate Horizontal Alignment
Horizontal alignment is one of the most important aspects of decorative mirror installation. When several mirrors are installed next to each other, their upper or lower edges should follow the intended design line.
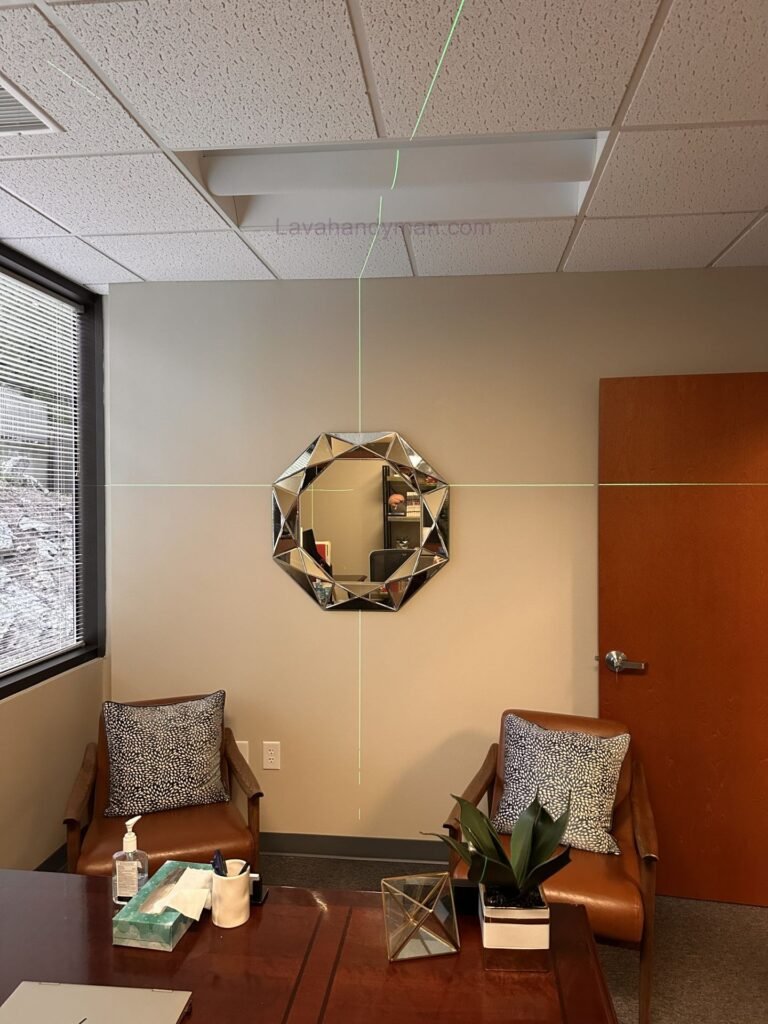
A laser level creates a clear horizontal reference that helps installers position mirrors at the correct height. This is particularly useful when installing a decorative mirror wall above a console table, sofa, reception desk, or other furniture.
Rather than measuring each mirror independently from the floor, installers can use the same laser reference to maintain a consistent layout across the wall.
Precise Vertical Positioning
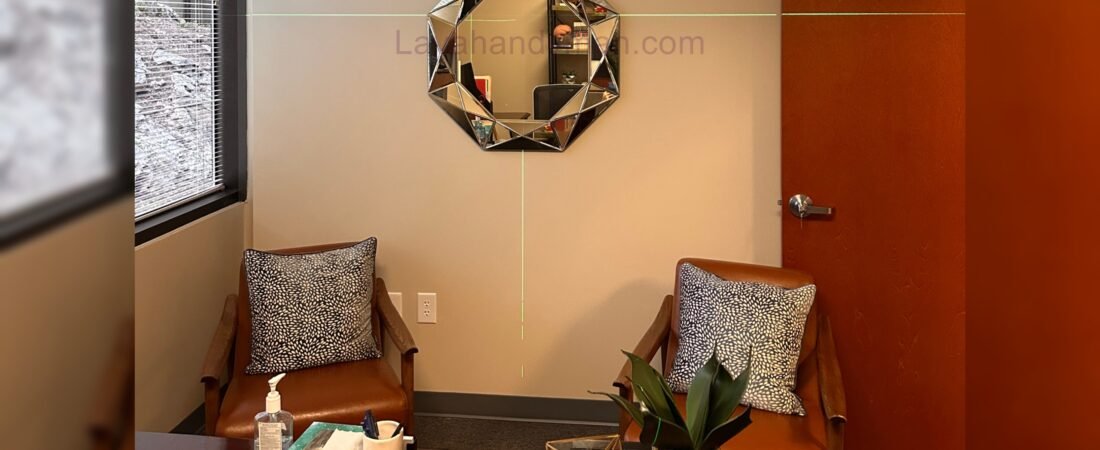
Vertical alignment is equally important when creating symmetrical mirror arrangements. A vertical laser line can identify the center of a wall or the center of a decorative composition.
Installing Decorative Mirrors on Walls
This makes it easier to position the first mirror correctly and align additional panels around it. For example, when installing a group of decorative mirrors above a console table, the vertical laser line can help establish a balanced arrangement relative to the furniture below.
Consistent Spacing Between Mirror Panels
Many modern interior designs use multiple decorative mirror panels arranged in geometric patterns. Maintaining equal spacing between these panels is essential for achieving a professional finish.
Although a laser level helps establish the main reference lines, accurate measurements are still necessary to maintain consistent gaps. A measuring tape, ruler, or suitable spacer can be used alongside the laser level to ensure that each mirror is positioned according to the original design.
Installing Decorative Mirrors on Walls
Reduced Installation Errors
Repeated measurements can introduce small errors, especially when installing several mirrors across a large wall. A laser level provides a common reference that helps reduce these inconsistencies.
When combined with careful planning and suitable mounting hardware, it can make decorative mirror installation more efficient, predictable, and accurate.
Installing Decorative Mirrors on Walls
Tools and Materials Needed for Installing Decorative Mirrors
Before beginning a mirror installation project, prepare all the required tools and materials. Having the correct equipment available helps prevent interruptions and reduces the risk of mistakes.
The essential tools for installing decorative mirrors using a laser level include a self-leveling laser level, measuring tape, pencil, ruler, appropriate drill and drill bits, suitable wall anchors, and the mounting hardware specified for the mirror.
A stud finder or suitable wall detector can help identify structural elements and certain concealed services. Protective equipment, including safety glasses and appropriate gloves, should also be available.
Depending on the installation method, additional materials may include mirror clips, mounting brackets, support rails, mirror-specific adhesive, non-staining spacers, and temporary supports.
Installing Decorative Mirrors on Walls
The correct materials depend on the mirror’s dimensions, weight, backing, wall construction, and manufacturer instructions. Always confirm that the selected mounting system is compatible with the mirror and the wall surface.
Never assume that a general-purpose construction adhesive is suitable for mirrors. Some products can damage the reflective backing or cause discoloration. Use only an adhesive specifically approved for the mirror and substrate.
Preparing the Wall for Decorative Mirror Installation
Proper wall preparation is essential for achieving a secure and long-lasting installation. Even when the mirrors are perfectly aligned with a laser level, an unsuitable wall surface can compromise the mounting system.
Installing Decorative Mirrors on Walls
Begin by inspecting the wall for cracks, loose paint, peeling wallpaper, dust, grease, moisture damage, and other surface defects. The installation area should be clean, stable, and suitable for the selected mounting method.
If repairs are necessary, complete them before installing the mirrors. Allow fillers, primers, paint, and other surface treatments to cure or dry according to their manufacturers’ instructions.
Identify the Wall Material
Installing Decorative Mirrors on Walls
Different wall materials require different mounting methods. Plasterboard, solid masonry, concrete, timber framing, and tiled surfaces have different structural properties and fixing requirements.
For example, a fixing suitable for a timber stud may not be appropriate for hollow plasterboard. Likewise, an anchor designed for masonry should not automatically be used in another wall type.
Installing Decorative Mirrors on Walls
Determine the wall construction before choosing the mounting hardware. For heavy or oversized decorative mirrors, ensure that the complete mounting system can safely support the mirror’s weight.
Check for Uneven Surfaces
An uneven wall can cause a mirror to sit incorrectly or create visible gaps behind its edges. Use a straightedge and visual inspection to identify significant irregularities.
Do not force a rigid mirror against an uneven surface. Excessive pressure can create stress in the glass and increase the risk of damage.
If the wall is unsuitable for the chosen mounting system, repair the surface or consult a qualified installer before continuing.
Installing Decorative Mirrors on Walls
Check for Concealed Services
Before drilling, identify the possible locations of electrical wiring, plumbing, heating lines, and other concealed services.
Use an appropriate detection method and review available building information where possible. If the proposed drilling area cannot be confirmed as safe, do not drill until the uncertainty has been resolved.
Installing Decorative Mirrors on Walls
Planning and Measuring the Decorative Mirror Layout
Accurate planning is one of the most important steps in professional mirror installation. Before drilling holes or applying adhesive, determine the exact position of every mirror.
Start by measuring the total width and height of the available wall area. Record the dimensions of nearby furniture, doorways, electrical outlets, wall switches, and other features that may affect the layout.
Next, decide whether the mirror arrangement should be centered on the wall, aligned with a piece of furniture, or positioned relative to another architectural feature.
The center of the wall is not always the best reference. In many interior spaces, the visual center of a sofa, console table, or reception desk provides a more appropriate alignment point.
Installing Decorative Mirrors on Walls
Calculate the Center Point
For a symmetrical decorative mirror arrangement, establish the center of the complete composition.
For example, if the planned mirror arrangement is 160 centimeters wide, its center is 80 centimeters from either side. This point can serve as the primary vertical reference for positioning the remaining mirrors.
For asymmetrical designs, choose a clear reference edge or another fixed point from which all measurements can be calculated.
Measure Each Mirror and Calculate the Gaps
Measure every mirror individually and record its width and height. Determine the required distance between adjacent panels before installation begins.
Installing Decorative Mirrors on Walls
For example, a design may require a consistent gap of 20 millimeters between mirror panels. Record this measurement and use it throughout the layout.
For complex geometric designs, create a drawing or full-size template showing the location of every mirror. This allows you to identify measurement errors before making permanent changes to the wall.
Check the Layout Before Mounting
Use removable tape or temporary marks to outline the planned mirror positions. Stand back and inspect the arrangement from the main viewing positions in the room.
Check whether the composition looks balanced, whether the gaps are consistent, and whether the mirrors relate correctly to the surrounding furniture and architecture.
Making adjustments during the planning stage is easier and safer than repositioning mirrors after they have been mounted.
Installing Decorative Mirrors on Walls
How to Use a Laser Level for Mirror Installation
Correct laser level setup is essential for accurate decorative mirror installation. The tool must be positioned securely and used within its operating limits.
Place the laser level on a stable tripod, platform, or suitable mounting bracket. Choose a position where the projected lines remain visible across the installation area.
If you are using a self-leveling laser level, allow the instrument to stabilize and confirm that it indicates a level condition. Do not use the reference line if the device indicates that it is outside its self-leveling range.
Installing Decorative Mirrors on Walls
Establish a Horizontal Laser Line
Project a horizontal laser line at the planned height of the mirror arrangement. Depending on the design, this line may represent the upper edge, lower edge, centerline, or mounting rail position.
Measure the intended height from a reliable reference point and compare it with the planned layout.
Avoid assuming that the floor or ceiling is perfectly level. Older buildings may have uneven floors, sloping ceilings, or walls that are not perfectly square. The laser reference should follow the intended design rather than automatically copying an irregular architectural edge.
Installing Decorative Mirrors on Walls
Establish a Vertical Laser Line
Project a vertical laser line through the center of the mirror arrangement or along the selected reference edge.
For symmetrical layouts, this line helps position the first mirror and establish the locations of the remaining panels.
For a multi-panel mirror wall, a central reference can help distribute the mirrors evenly on both sides and maintain the intended visual balance.
Verify Laser Level Accuracy
Installing Decorative Mirrors on Walls
Check the laser level according to the manufacturer’s calibration instructions, especially if the instrument has been dropped or transported roughly.
If the accuracy of the tool is uncertain, verify the reference using an appropriate independent method or a professionally checked instrument.
If the laser level must be moved during installation, re-establish the reference lines before continuing.
Step-by-Step Guide to Installing Decorative Mirrors Using a Laser Level
Installing Decorative Mirrors on Walls
Once the wall is prepared, the layout is confirmed, and the mounting method has been selected, the installation can begin.
Step 1: Confirm All Measurements
Review the wall dimensions, mirror sizes, centerline, panel gaps, and mounting positions. Compare the planned measurements with the actual mirrors before beginning work.
Inspect each mirror for cracks, chips, or other damage. Do not install damaged mirrors, especially if their edges or structural integrity may have been compromised.
Step 2: Recheck the Laser Reference Lines
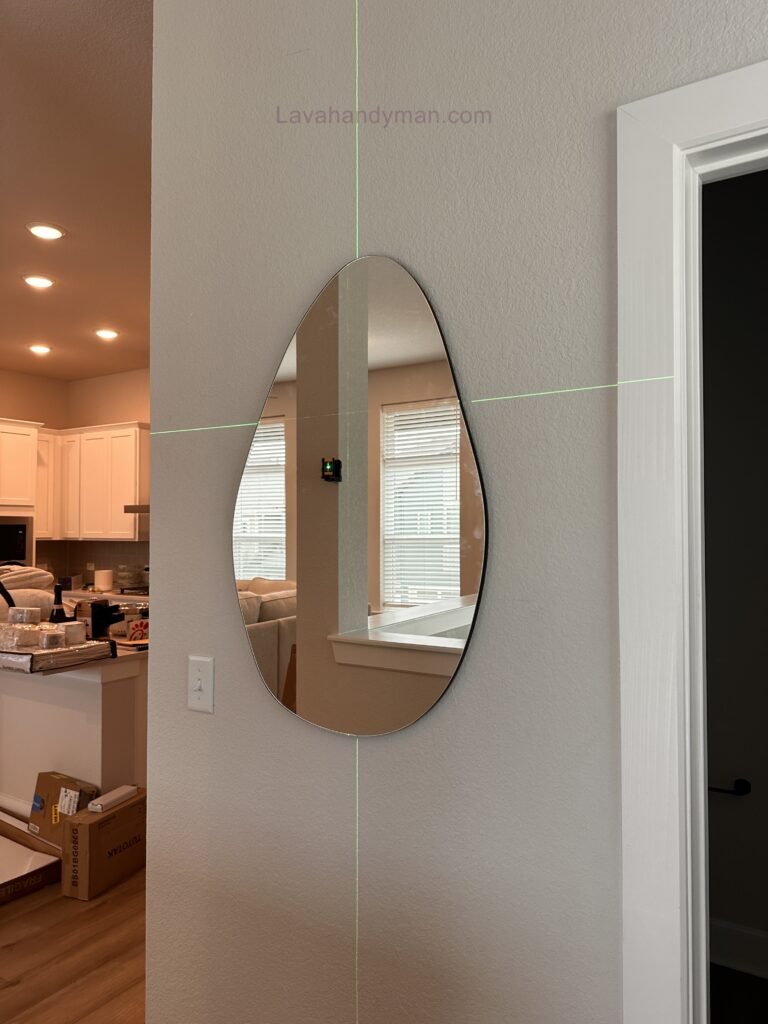
Switch on the laser level and confirm that the horizontal and vertical lines correspond to the planned layout.
Installing Decorative Mirrors on Walls
If the instrument has been moved since the original measurements were taken, verify its position again before making any permanent marks.
Step 3: Mark the Mounting Positions
Use the laser lines and measuring tape to identify the exact positions of the mounting hardware.
For mechanical mounting systems, remember that the fixing points may not correspond directly to the visible edges of the mirror. Account for the dimensions of the clips, brackets, rails, or hanging hardware.
Check the mounting positions against the mirror manufacturer’s specifications before drilling.
Installing Decorative Mirrors on Walls
Step 4: Install the Mounting Hardware
If mechanical fixings are required, drill the appropriate holes using the correct drill bit and installation procedure.
Install the specified anchors, clips, brackets, or mounting rails according to the hardware manufacturer’s instructions.
Use the laser level to check the alignment of components such as mounting rails that must be installed horizontally.
If a fixing feels loose or the wall material breaks apart, stop and resolve the issue before placing any weight on the mounting system.
Step 5: Prepare the Mirror
Installing Decorative Mirrors on Walls
Handle the mirror carefully using suitable protective equipment and safe lifting techniques.
Clean the relevant surfaces with products approved by the mirror manufacturer. If adhesive is required, follow the product instructions for surface preparation, application, and curing.
Avoid unnecessary contact with bonding surfaces and never place concentrated pressure on a vulnerable glass edge.
Step 6: Position the First Mirror
The first mirror often establishes the alignment for the rest of the installation.
Installing Decorative Mirrors on Walls
Carefully lift the mirror into position and align the relevant edge or mounting reference with the laser line. Check the vertical position against the planned centerline or edge reference.
Engage the mirror with the mounting system according to the manufacturer’s instructions.
If an adhesive system is used, provide the specified temporary support and follow the required installation procedure. Do not release the mirror until it is safely supported.
Step 7: Check the Alignment
Inspect the first mirror from the front and from the main viewing positions in the room.
Installing Decorative Mirrors on Walls
Confirm that it is positioned correctly, that the edges follow the intended reference lines, and that the mirror is visually aligned with the surrounding design.
Make any permitted adjustments before continuing with the remaining panels.
Step 8: Install the Remaining Mirrors
Use the same reference lines and recorded measurements to position the remaining mirrors.
Installing Decorative Mirrors on Walls
For symmetrical layouts, working outward from the center can help maintain balance. For other designs, follow the predetermined installation sequence.
Measure the gap between each pair of mirrors rather than estimating it visually. Check every new panel against the overall layout to prevent small errors from accumulating.
Step 9: Secure the Mirrors Properly
Complete the required mechanical fixings, supports, and adhesive procedures according to the manufacturer’s instructions.
Respect the specified adhesive curing period and keep temporary supports in place for the required time.
Installing Decorative Mirrors on Walls
Do not assume that an adhesive has reached full strength simply because its surface feels dry.
Step 10: Clean and Inspect the Finished Wall
Once the mounting system permits final cleaning, remove fingerprints, dust, and temporary layout marks using suitable cleaning products and soft materials.
Inspect the completed arrangement from several viewing angles. Confirm that the mirrors are aligned, the gaps are consistent, and the mounting hardware is correctly secured.
A professional mirror installation should meet both visual and safety requirements before the area is returned to normal use.
Installing Decorative Mirrors on Walls
Choosing the Best Mounting Method for Decorative Mirrors
The correct mounting method depends on the mirror’s dimensions, weight, backing, wall material, and manufacturer recommendations.
Mirror Clips and Mounting Brackets
Mirror clips and brackets can provide reliable mechanical support when correctly specified and installed.
They are useful for many framed and frameless mirror installations and may allow the mirror to be removed for maintenance.
The hardware must be compatible with the mirror’s thickness and designed to support its weight. Install the fixings into suitable structural material or approved anchors, and avoid overtightening clips against the glass.
Installing Decorative Mirrors on Walls
Mirror Mounting Rails
Mounting rails can distribute the load across several fixing points and help simplify alignment.
They are suitable for particular mirror systems when the rail and its fasteners are rated for the mirror and wall construction.
Use the laser level to align the rail before securing it, and verify that all required fixings are correctly installed before hanging the mirror.
Mirror-Specific Adhesive
Installing Decorative Mirrors on Walls
Some decorative mirrors can be installed using adhesive specifically approved for mirror backing and the wall substrate.
The performance of an adhesive system depends on surface preparation, temperature, humidity, application thickness, and curing time.
Follow the manufacturer’s instructions precisely. Large or heavy mirrors should not be mounted using adhesive alone unless the mirror and adhesive manufacturers explicitly approve that application and the complete system meets the required safety specifications.
Combined Mechanical and Adhesive Support
Certain installations require both adhesive and mechanical support. When this method is specified, every component must be compatible with the mirror, substrate, and expected load.
Installing Decorative Mirrors on Walls
Combining different mounting methods does not automatically make an installation safe. Always follow the approved installation specification.
Professional Tips for Accurate Mirror Alignment
Achieving a professional finish requires more than projecting a laser line. Careful measuring, consistent spacing, and regular checks are equally important.
First, establish one primary horizontal reference and one primary vertical reference wherever appropriate. Use these references to calculate the remaining mirror positions rather than repeatedly measuring from adjacent panels.
Installing Decorative Mirrors on Walls
Second, use suitable spacers or a reliable measuring method to maintain equal gaps between mirrors. Small differences may be difficult to notice during installation but can become obvious when the finished wall is viewed as a whole.
Third, check the overall arrangement regularly. Inspect the composition after installing the first mirror and again after completing each major section.
Fourth, consider lighting and reflections. Decorative mirrors reflect windows, light fixtures, furniture, and other objects. Their position should support the intended interior design and not merely follow the geometric center of the wall.
Finally, use a full-size template for complicated layouts. A template can help verify the spacing and shape of a geometric mirror wall before drilling or applying adhesive.
Installing Decorative Mirrors on Walls
Common Decorative Mirror Installation Mistakes to Avoid
One of the most common mistakes is relying entirely on visual judgment. A mirror may appear straight when viewed close up but look uneven from across the room. Always verify alignment using reliable reference lines and measurements.
Another mistake is measuring from an uneven floor or ceiling. Establish a dependable reference with the laser level and plan the layout according to the design.
Using the wrong adhesive is another serious problem. Incompatible products may damage the mirror backing or fail to provide reliable support. Select products specifically approved for the mirror and wall surface.
Installing Decorative Mirrors on Walls
Incorrect wall anchors can also compromise the installation. Different substrates require different fixing systems, and heavy mirrors need appropriate support.
Inconsistent spacing between mirror panels can reduce the quality of the finished design. Measure each gap and maintain the specified distance throughout the installation.
Moving the laser level without checking its position can invalidate earlier measurements. Re-establish the reference lines whenever the instrument is moved.
Finally, avoid applying excessive pressure to a mirror or removing temporary supports too early. Follow the mounting system manufacturer’s instructions and ensure the installation is stable before completing the project.
Installing Decorative Mirrors on Walls
Safety Guidelines for Professional Mirror Installation
Safety is essential when installing decorative mirrors because glass can be heavy, fragile, and dangerous if it falls or breaks.
Wear appropriate protective equipment, including eye protection and suitable gloves. Use safe lifting techniques and obtain assistance when handling large mirrors.
Keep the work area clear, and store mirrors securely when they are not being installed. Never leave a large mirror leaning in an unstable position.
Installing Decorative Mirrors on Walls
Before drilling, identify possible concealed electrical cables, water pipes, and other services. Use suitable detection methods and follow safe drilling procedures.
Use a stable work platform when installing mirrors at height. Avoid stretching from a ladder or standing on furniture.
Operate the laser level according to its safety classification and manufacturer’s instructions. Never look directly into the laser beam or aim it toward another person’s eyes.
For oversized, heavy, or difficult-to-access mirrors, consider using trained installers and appropriate lifting equipment.
If the wall condition or mounting requirements are uncertain, seek qualified advice before proceeding. A visually attractive mirror wall is only successful when the installation is also secure.
Installing Decorative Mirrors on Walls
Decorative Mirror Installation Ideas for Different Interior Spaces
Decorative mirrors can enhance many types of interiors, but the layout should reflect the purpose and proportions of the room.
Living Rooms
In living rooms, decorative mirrors are often installed above console tables, sofas, or feature walls. Use the laser level to establish a clean relationship between the mirror arrangement and nearby furniture.
Consider what the mirrors will reflect, particularly windows, light fixtures, and prominent architectural features.
Bedrooms
Installing Decorative Mirrors on Walls
Bedroom mirror installation should balance appearance and functionality. Plan the mirror position carefully and ensure that the mounting system is suitable for the mirror dimensions and wall material.
Hallways and Entryways
Hallways often have limited wall space. Accurate measurements and vertical alignment can help create an organized appearance without obstructing doors or circulation routes.
Commercial Interiors
Hotels, offices, salons, reception areas, and retail spaces frequently use decorative mirrors to create a modern and welcoming atmosphere.
Commercial installations may involve larger mirrors and greater exposure to accidental contact. Select mounting hardware and protective measures according to the project requirements and applicable regulations.
Installing Decorative Mirrors on Walls
Bathrooms and Humid Areas
Bathrooms require additional attention to moisture resistance, corrosion, and compatibility with wet-area substrates.
Choose mirrors and mounting components suitable for the environment. Follow the manufacturer’s requirements for moisture protection, ventilation, and electrical safety around nearby fixtures.
Maintaining Decorative Mirrors After Installation
Installing Decorative Mirrors on Walls
Proper maintenance helps preserve the appearance and condition of decorative mirrors.
Clean the glass with a suitable mirror cleaner and a soft, non-abrasive cloth. Avoid harsh chemicals that may damage the mirror backing, frame, decorative finishes, or surrounding sealants.
Prevent excess liquid from collecting around mirror edges, particularly where moisture could reach the backing or mounting components.
Inspect visible brackets, clips, and other accessible mounting hardware periodically. Look for signs of corrosion, loosening, cracking, or movement.
If a mirror begins to shift or develop an unexpected gap, restrict access to the area and arrange a suitable inspection. Do not attempt to correct a loose heavy mirror simply by pressing it back into place.
Installing Decorative Mirrors on Walls
Frequently Asked Questions About Installing Decorative Mirrors
How do you install decorative mirrors using a laser level?
Measure the wall, plan the layout, and project horizontal or vertical laser reference lines. Mark the mounting positions, install compatible hardware, and align each mirror with the planned references. Follow the mirror and mounting system manufacturer’s instructions throughout the process.
Why is a laser level important for mirror installation?
A laser level provides consistent horizontal and vertical reference lines, helping installers position mirrors accurately and maintain even alignment. It is particularly useful for multiple mirror panels and symmetrical decorative wall designs.
Installing Decorative Mirrors on Walls
What tools are needed to install decorative wall mirrors?
Common tools include a laser level, measuring tape, pencil, suitable mounting hardware, a drill when required, appropriate wall anchors, and protective equipment. The exact tools depend on the mirror, wall construction, and mounting method.
How do you keep multiple decorative mirrors evenly spaced?
Plan the complete layout before installation, establish reference lines, and use consistent measurements or suitable spacers to maintain equal gaps. Check each mirror against the overall design rather than relying only on visual judgment.
Can heavy decorative mirrors be installed using adhesive alone?
Installing Decorative Mirrors on Walls
Adhesive alone should only be used when the mirror and adhesive manufacturers explicitly approve that application and the complete mounting system is suitable for the load and substrate. Large or heavy mirrors may require mechanical support.
How can you prevent crooked mirror installation?
Prepare the wall, verify the laser level, measure the mirror positions carefully, and check alignment throughout the installation. Recheck the reference lines if the instrument is moved, and avoid relying on uneven floors or ceilings as the only measuring reference.
Conclusion
Installing decorative mirrors using a laser level is an effective way to achieve precise alignment, consistent spacing, and a professional finish. The process combines accurate measurements, careful planning, suitable mounting hardware, proper surface preparation, and systematic installation techniques.
Installing Decorative Mirrors on Walls
A laser level provides reliable horizontal and vertical references that help reduce alignment errors, particularly when installing multiple decorative mirror panels. However, the quality of the finished wall also depends on the condition of the substrate, the suitability of the mounting system, and compliance with the manufacturer’s installation instructions.
By following the techniques in this guide, homeowners, contractors, interior designers, and professional installers can improve the accuracy and consistency of decorative mirror installation projects.
Ultimately, professional mirror installation is about more than positioning glass on a wall. It involves creating a balanced design feature that complements the interior, enhances the appearance of the space, and remains securely supported over time. With the right tools, careful measurements, and appropriate safety practices, you can achieve a clean, precise, and long-lasting decorative mirror wall.
📞 Need Help?
Let us take care of the hard work while you sit back and relax.
📍 Serving: Austin, Round Rock, Cedar Park & more
📱 Call or Text: (737) 420-6992
🌐 Visit: https://lavahandyman.com