Mounting a TV on the Living Room Wall with Professional Lighting (LED, Spotlights, and Hidden Lighting)
The TV is the centerpiece of any living room. Properly mounting it on the wall not only saves space but also provides a comfortable and professional viewing experience. When professional lighting is added—including LED backlighting, ceiling spotlights, and hidden lights—it creates a cinematic atmosphere and gives the space a modern, stylish look. This article explains step by step how to install your TV and achieve professional lighting.
1. Choosing the Right TV Location
Mounting a TV on the Living Room
Standard Height
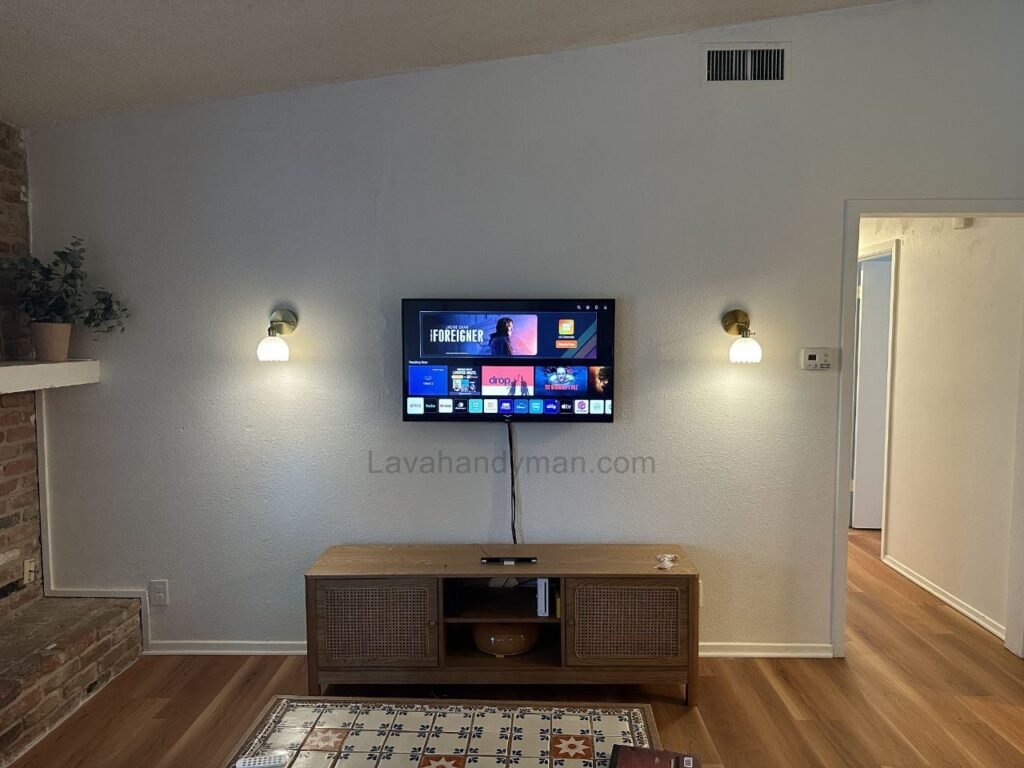
- The center of the screen should be approximately at eye level when sitting on the sofa.
- Standard height for 40–65 inch TVs: 110–130 cm from the floor.
- For larger TVs or spacious living rooms, slightly higher placement is acceptable.
Viewing Distance
- Approximate formula: Distance (cm) ≈ TV size (inches) × 2.5
Example: 55-inch TV → Distance ≈ 137 cm.
Natural Light Considerations
- Avoid placing the TV where direct sunlight or room lights reflect on the screen.
- Curtains or blinds can help control natural light.
Coordination with Decor
- A matte or dark wall behind the TV enhances the LED effect and reduces reflections.
Mounting a TV on the Living Room
2. Wall Check and Tool Selection
Wall Type
- Concrete or brick walls: Ideal for supporting the TV’s weight.
- Drywall or MDF: Requires reinforced anchors or a metal frame for stability.
TV Mount Selection
Mounting a TV on the Living Room
- Fixed mount: Simple installation, no movement.
- Articulating mount: Allows left-right swivel.
- Tilt mount: Adjusts the TV angle up or down.
Required Tools
- Drill and appropriate wall bits
- Standard screws and wall anchors
- Level and measuring tools
- Measuring tape and pencil
- Screwdriver or wrench
Mounting a TV on the Living Room
3. Preparation and TV Installation
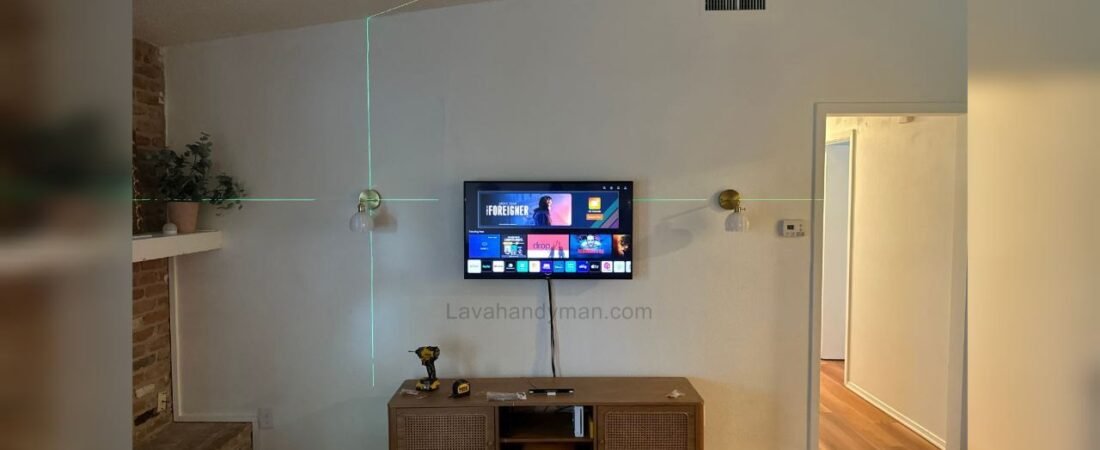
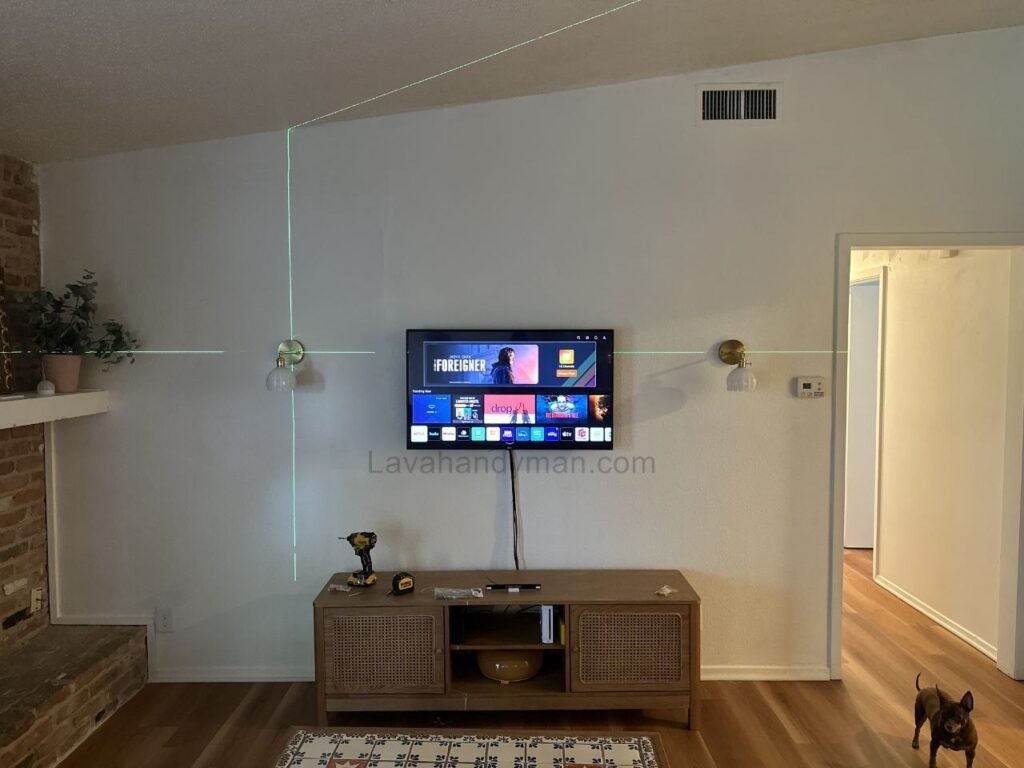
Marking Mounting Points
- Use a level to mark the exact locations for screws.
- For articulating or tilt mounts, consider arm reach and center alignment.
Installing the Mount and TV
- Install wall anchors and securely attach the mount.
- Check with a level to ensure it is straight.
- Attach TV brackets to the mount.
- Test for stability and any wobble.
Mounting a TV on the Living Room
4. Cable Management
- Use wall cable channels or in-wall wiring for a clean and safe look.
- Keep power and HDMI cables separate from LED wires to avoid interference.
- Use a quality surge protector for added safety.
5. Professional Lighting
Combining LED backlighting, ceiling spotlights, and hidden lighting creates a cinematic and professional effect.
LED Backlighting
- Reduces eye strain and enhances the cinematic feel.
- Install LED strips behind the TV, 5–10 cm from the edges.
- Connect to a 5V or 12V power supply; optionally control via Wi-Fi or Bluetooth.
Ceiling Spotlights
- Provide focused, direct lighting for the living room.
- Adjust the angle so light does not hit the TV screen directly.
Hidden Lighting
- Creates soft, ambient light across the room.
- Install in a false ceiling or behind wall panels.
- Can be coordinated with the LED backlighting for a professional look.
Combining Lights
- LED + spotlights + hidden lighting → true cinematic effect.
- Light intensity should be comfortable for the eyes.
- Smart controllers can adjust colors, intensity, and effects.
Mounting a TV on the Living Room
6. Safety and Technical Tips
- Ensure the wall and mount can support the TV weight.
- Use quality screws and anchors.
- Keep cables away from walkways.
- Monitor heat from LEDs and spotlights.
- Use certified power supplies and controllers for LED systems.
Mounting a TV on the Living Room
7. Aesthetic Considerations
- Choose light colors that match the room decor.
- A dark or matte wall behind the TV enhances the LED effect.
- A simple frame or wooden panel behind the TV adds a luxurious look.
- Combining ambient and LED lights creates a true home cinema experience.
8. Maintenance and Care
- Dust the back of the TV and LEDs regularly.
- Check cable connections and power supplies periodically.
- Avoid pressing hard on the TV or LED strips.
- Adjust LED and spotlight intensity according to room needs.
Mounting a TV on the Living Room
Step-by-Step Guide to Installing Spotlights and Hidden Lighting Behind a TV
Professional lighting behind a TV using ceiling spotlights and hidden LED lighting creates a cinematic atmosphere in the living room, reduces eye strain, and gives the space a modern, luxurious look. The following is a step-by-step guide to installation.
Tools and Materials Needed
- Ceiling spotlights (LED or standard)
- Power supply for spotlights (if needed)
- LED strip lights for hidden lighting (RGB or warm white)
- LED controller (optional, for color and brightness control)
- Electrical wires and cables
- Transformer or adapter for LEDs
- Light switch (can be smart)
- Drill and appropriate bits for wall and ceiling
- Screws and anchors
- Measuring tape, pencil, and level
Mounting a TV on the Living Room
Step 1: Planning and Design
- Determine the TV placement on the wall
- Center of the TV should be at eye level when seated.
- Mark the positions for ceiling spotlights
- Typically, 4–6 spotlights are sufficient.
- Spotlights should be positioned so that light does not directly hit the TV screen, providing even room illumination.
- Plan the hidden LED lighting path
- Can be installed in a false ceiling or behind wall panels.
- The LED length is usually proportional to the TV or wall width behind the TV.
Mounting a TV on the Living Room
Step 2: Prepare Ceiling and Wall
- Cut openings for the spotlights
- In the false ceiling or designated location, drill or cut holes for the spotlights.
- Keep equal spacing between each hole.
- Prepare the path for hidden LEDs
- Create grooves or channels for LED strips on the ceiling or wall panel.
- Ensure the surface is smooth and clean for proper adhesion of LED strips.

Mounting a TV on the Living Room
Step 3: Install the Spotlights
- Connect electrical wires
- Route power wires from the switch or power source to the spotlight locations.
- If using LED spotlights, install a suitable transformer.
- Insert the spotlights
- Place the spotlights in the cut openings and secure them with clips or screws.
- Initial test
- Turn on the power to confirm that all spotlights work correctly.
Step 4: Install Hidden LED Lighting
- Attach the LED strips
- Stick the LED strips behind the TV or along the planned path.
- Maintain a distance of 5–10 cm from edges for uniform light distribution.
- Connect to power supply and controller
- Connect the LED wires to the adapter.
- If using a smart controller, install it between the LED and adapter.
- Adjust color and brightness
- Select color and intensity to match the room’s decor.
- LED lighting should be soft and coordinated with the spotlights.
Mounting a TV on the Living Room
Step 5: Combine and Adjust the Lights
- Adjust spotlight angles
- Ensure light does not directly hit the TV.
- Provide even illumination across the room.
- Coordinate LEDs and spotlights
- Adjust intensity and color for a cinematic effect.
- Set different lighting modes for “movie time,” “reading,” or “entertaining guests.”
- Final check
- Test the lighting system using the switch or remote.
- Confirm all lights function correctly and create the desired effect.
Mounting a TV on the Living Room
Step 6: Safety and Maintenance
Avoid long-term use of LEDs at maximum brightness to prevent overheating.
Check all wires and connections before turning on power.
Use appropriate transformers and adapters for LEDs and spotlights.
Keep wires out of walkways.
Clean dust from LEDs and spotlights regularly.
Mounting a TV on the Living Room
Types of TV Wall Mounts
There are several common types of TV wall mounts. Choosing the right one depends on TV size, wall type, available space, and the need to adjust the viewing angle. Here’s a breakdown of each type, with advantages, disadvantages, and recommended use:
1. Fixed Wall Mount
- The TV is mounted completely flat and close to the wall.
- Advantages: Easy to install, inexpensive, clean and low-profile appearance.
- Disadvantages: Viewing angle is fixed; side views may be less optimal.
- Best for: Small to medium TVs or locations where the TV is always viewed from straight ahead.
2. Articulating / Full-Motion Mount
- Allows the TV to move left, right, up, down, and even pull away from the wall.
- Advantages: High flexibility; ideal for large or angled rooms for the best viewing experience.
- Disadvantages: More expensive, slightly more complex to install, requires more space than fixed mounts.
- Best for: Large living rooms or when the TV is viewed from multiple locations.
Mounting a TV on the Living Room
3. Tilt Mount
- The TV tilts slightly up or down.
- Advantages: Reduces glare and improves viewing angle from lower or higher positions; requires little space.
- Disadvantages: Cannot move sideways.
- Best for: TVs mounted higher than seating areas or on tall walls.
Mounting a TV on the Living Room
4. Swivel / Tilt & Swivel Mount
- Combines tilting and rotating, allowing horizontal adjustment and slight vertical tilt.
- Advantages: Moderate to high flexibility; good for adjusting the viewing angle.
- Disadvantages: Higher cost; installation is slightly more complex.
- Best for: Medium to large rooms where multiple viewing angles are needed.
Key Points When Choosing a Wall Mount
Viewing Angle: If you want the TV visible from multiple angles, a tilt or articulating mount is recommended.
TV Weight: The mount must support the TV’s weight.
TV Size: The mount should match the TV size.
Wall Type: For drywall or MDF, use reinforced anchors or a metal frame.
Mounting a TV on the Living Room
Space Around the TV: Articulating and tilt mounts require more space than fixed mounts.
Optimal Height for Mounting a TV on the Wall
The height at which a TV is mounted plays a key role in viewing comfort, reducing eye strain, and enhancing room aesthetics. The optimal height depends on TV size, distance from the seating area, and the natural eye level when seated.
1. General Guidelines
- The center of the screen should be approximately at eye level when seated on the sofa.
- Standard height: 110–130 cm from the floor to the center of the TV.
- For larger TVs or spacious rooms, mounting slightly higher is acceptable.
2. Determining the Exact Height Based on Seating Distance
A simple formula for comfortable viewing distance:Distance (cm)≈TV size (inches)×2.5
Example:
55-inch TV → Distance ≈ 55 × 2.5 = 137.5 cm
- The center of the TV should align roughly with eye level when seated.
- For longer distances, the TV can be mounted slightly higher for a better viewing angle.
Mounting a TV on the Living Room
3. Additional Tips
If installing LED or hidden lighting behind the TV, choose a height that allows even light distribution and an aesthetically pleasing effect.
Control light and glare:
Mount the TV where direct sunlight or strong artificial light does not reflect on the screen.
Neck comfort:
Viewing angle should be around 10–15 degrees downward or straight to prevent neck strain.
Coordination with backlighting:
Mounting a TV on the Living Room
Conclusion
Mounting a TV on the wall with professional lighting not only improves aesthetics but also provides a comfortable and immersive viewing experience. Key steps for a professional installation:
- Choose the right TV location and height
- Check the wall and select a suitable mount
- Install the TV and mount securely
- Manage cables and power connections
- Install LED backlighting, spotlights, and hidden lighting
- Combine lights for a cinematic effect
- Follow safety and technical guidelines
- Coordinate lighting with room decor
- Maintain and care for the system regularly
Following these steps ensures a stylish, professional-looking living room and an enhanced viewing experience for you and your family.
📞 Need Help?
Let us take care of the hard work while you sit back and relax.
📍 Serving: Austin, Round Rock, Cedar Park & more
📱 Call or Text: (737) 420-6992
🌐 Visit: https://lavahandyman.com