Best Ideas for Two-Tone Sheer Curtains in the Living Room | Photos + Guide
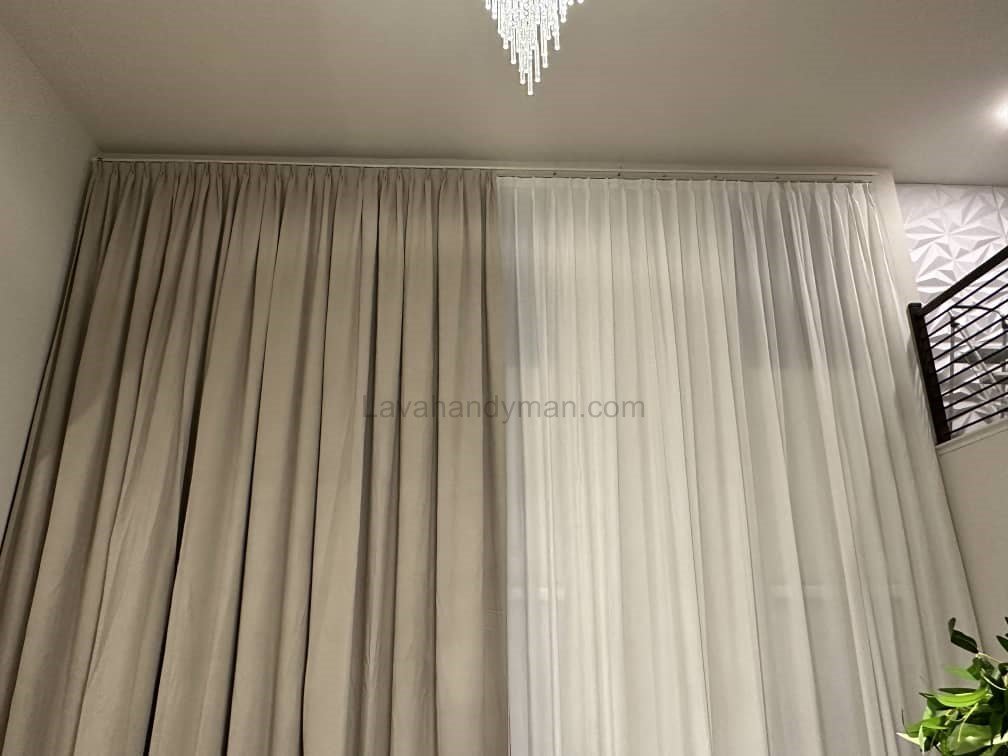
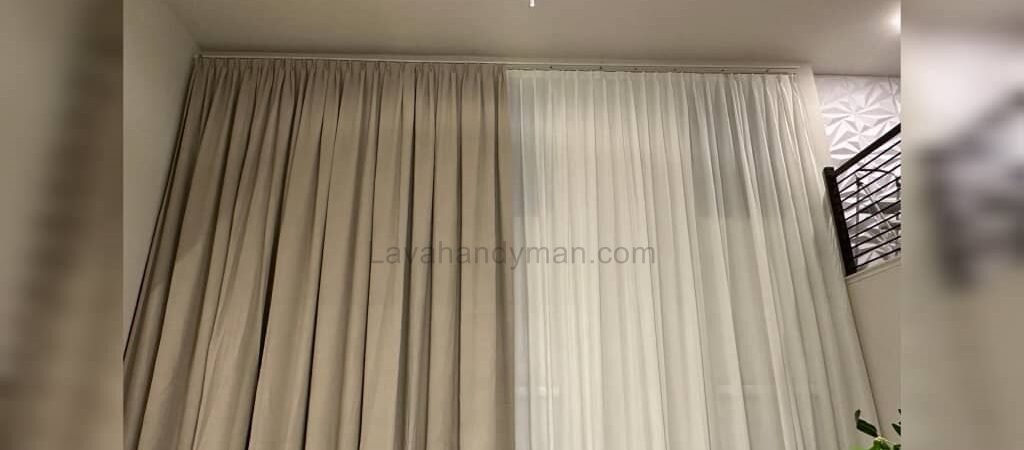
Two-tone sheer curtains have become one of the most popular choices in modern home décor. They add beauty, depth, and softness to the living room while allowing natural light to pass through gently. If you’re planning to refresh your living room décor, installing two-tone sheer curtains is one of the simplest yet most stylish upgrades.
This comprehensive guide covers everything from choosing curtain colors to step-by-step installation and essential tips.

Why Choose Two-Tone Sheer Curtains for Your Living Room?
1. Enhanced Visual Appeal
Two-tone curtains create visual variety and prevent the space from looking monotonous. The color contrast adds depth and draws attention toward the windows.
2. Suitable for All Interior Styles
Whether your living room follows a modern, minimalist, classic, or luxury style, two-tone sheer curtains blend seamlessly with any décor.
3. Soft Light Diffusion
Sheer fabric naturally allows light to pass through, creating a bright and airy atmosphere—ideal for living rooms.
4. Makes the Room Look Larger
The lightness of sheer fabric combined with a two-tone design can visually expand the space, making it appear brighter and more spacious.
How to Choose the Best Colors for Two-Tone Sheer Curtains
1. Match with Your Furniture
Curtain colors should complement your sofa and other furniture:
- Gray sofas → White + Light Gray curtains
- Beige or brown sofas → Cream + Brown
- Blue sofas → White + Soft Blue
2. Based on Natural Light
If your living room gets limited sunlight, choose lighter tones. Darker shades work better in large, bright spaces.
3. Match with Wall Colors
To maintain visual harmony, at least one curtain color should relate to the wall or décor tones.
4. Trendy Two-Tone Color Combos
- White + Cream
- Gray + Silver
- Emerald Green + Gold
- Black + White
Best Fabric Options for Two-Tone Sheer Curtains
1. Simple Sheer
Lightweight and perfect for minimalist, bright interiors.
2. Crystal Sheer
Shiny and luxurious—ideal for modern décor.
3. Thick Sheer
Provides better light control.
4. Lame Sheer
Slightly shiny fabric, suitable for classic or luxury spaces.
Step-by-Step Guide: How to Install Two-Tone Sheer Curtains
Step 1: Accurate Measurement
Before installing your curtains, measure:
- Wall or window width
- Height from ceiling to floor
- Desired curtain fullness
- Number of layers
Step 2: Choosing the Right Rod or Track
A double curtain track is recommended for two-tone sheer curtains to ensure smooth movement.
Step 3: Installing the Track or Rod
- Mark the installation points
- Drill holes
- Fix the brackets
- Install the first and second tracks
Step 4: Hanging the Curtains
- Hang the lighter curtain layer first.
- Add the second, darker, or complementary layer.
- Adjust the pleats evenly.
Step 5: Final Adjustments
- Check the curtain fall
- Smooth out the pleats
- Steam the fabric lightly if needed
Popular Two-Tone Color Ideas for Living Room Curtains
Light and Airy Combinations
- White + Cream
- Beige + Sand
- White + Light Gray
Modern Color Combos
- Gray + Black
- White + Silver
- Navy + White
Luxury Color Options
- Gold + Cream
- Burgundy + Ivory
- Champagne + Brown
Common Mistakes to Avoid When Installing Two-Tone Sheer Curtains
1. Curtains That Are Too Short
Living room curtains should ideally touch the floor.
2. Using a Single Track
Two-tone curtains need a double track for proper movement.
3. Poor Color Coordination
Curtain shades should align with your living room theme.
4. Uneven Pleats
Neat pleats are essential for the elegant look of sheer curtains.
How to Wash and Care for Two-Tone Sheer Curtains
1. Hand Washing is Best
Use cold water and a mild detergent.
2. Machine Washing (If Necessary)
- Low temperature
- Gentle cycle
- No spin or dryer
3. Ironing
Iron from the backside using low steam to avoid fabric shine.
Step-by-Step Guide to Installing Two-Tone Sheer Curtains in the Living Room
Tools You Need
Prepare these tools before you begin:
- Measuring tape
- Pencil for marking
- Level
- Drill and appropriate drill bit
- Wall plugs and screws
- Brackets or curtain rod holders
- Double curtain track or rod
- Rings, hooks, or rail runners
- Step stool or ladder
- Steam iron or garment steamer
Step 1: Take Accurate Measurements
1. Measure the Width
Measure the window frame width and add 10–20 cm (4–8 inches) on each side.
This extra width helps the curtains stack neatly without blocking natural light.
2. Measure the Height
To make your living room look taller, install the rod or track closer to the ceiling.
For a standard, elegant look:
- Leave 1–3 cm (½–1 inch) between the curtain and the floor.
- For a more luxurious look, let the curtain slightly puddle on the floor (optional).
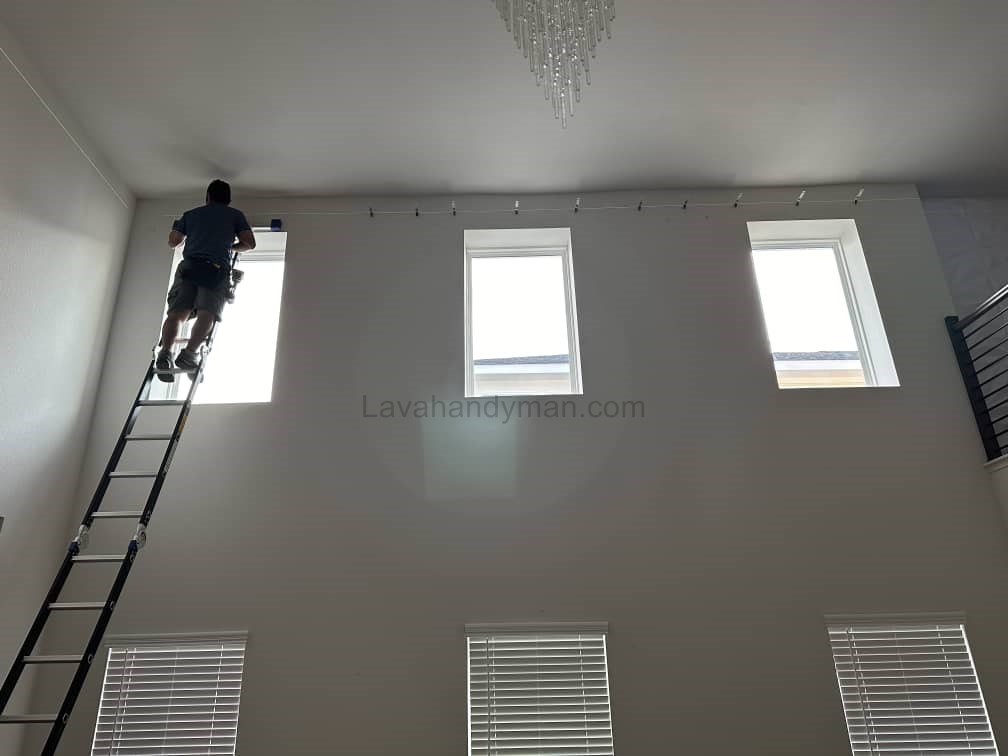
Step 2: Mark the Installation Points
- Find the center of the window.
- Use a level to mark the exact position of the brackets.
- For tracks longer than 2 meters (6.5 ft), add a middle bracket for better support.
Step 3: Install the Brackets
- Drill holes at the marked points.
- Insert wall plugs.
- Secure the brackets with screws.
- Mount the rod or double track onto the brackets and ensure it is stable and level.
Step 4: Prepare the Curtains
For two-tone sheer curtains, a double track is usually the best choice.
- Attach the hooks or rings to the back layer first.
- Prepare the front layer in the same way.
- If you want neat, even pleats, use pleat tape or a pleating band.
Step 5: Hang the Curtains
- Start with the back layer (the lighter or sheer layer).
- Hang the front layer on the front track.
- Adjust the pleats evenly from the center toward the sides.
- Open and close the curtains several times to check smooth movement.
Step 6: Final Adjustments
- Use a steamer to remove wrinkles and smooth the fabric.
- If the curtains are too long or short, adjust or hem the lower edge.
- Use tiebacks or holdbacks if you want the curtains neatly gathered when open.
Pro Tips for a Better Installation
- For a fuller, more luxurious appearance, use 2x to 2.5x the width of your window in fabric.
- If your wall is drywall or plaster, use stronger wall anchors.
- Add a middle bracket to prevent rod bending, especially for heavy fabrics.
- High-quality tracks help the curtain slide smoothly and quietly.
Quick Troubleshooting
| Problem | Likely Cause | Solution |
|---|---|---|
| Curtain gets stuck | Track not level | Adjust track alignment |
| Uneven pleats | No pleat tape | Re-arrange or install pleat tape |
| Curtain too long/short | Measurement error | Hem or adjust mounting height |
Types of Brackets Used for Installing Two-Tone Sheer Curtains
Choosing the right bracket is one of the most important steps in installing curtains—especially two-tone sheer curtains commonly used in living rooms. Brackets determine the stability, appearance, and durability of your curtain installation. Below is a complete, practical, and SEO-optimized guide to the best types of brackets used for curtain mounting.
1. Wall Bracket
A wall bracket is one of the most common options for mounting a curtain rod or track on the wall.
Best for:
- Single curtain rods
- Double curtain rods
- Homes with enough space above the window frame
Advantages:
- Easy installation
- Affordable
- Strong and durable
Disadvantages:
- Not ideal when the space between the window frame and ceiling is too small.
2. Ceiling Bracket
If you want your curtains to hang from ceiling to floor, a ceiling bracket is the best choice. It also gives the living room a more modern and elegant look.
Advantages:
- Clean and minimal appearance
- Perfect for double curtain tracks
- Makes the room appear taller and more spacious
Disadvantages:
- Requires a ceiling strong enough to hold screws and anchors
3. Double Track Bracket
This is the ideal option for two-layer or two-tone curtains, such as sheer + blackout or sheer + decorative fabric.
Advantages:
- Allows each curtain layer to move independently
- Creates a clean, professional look
- Perfect for modern living rooms
Disadvantages:
- Must be installed with precise leveling
4. Double Rod Bracket
These brackets are used when you want to install two curtain rods instead of a track—common in classic or traditional décor.
Advantages:
- Attractive and decorative appearance
- Supports two layers of curtains (sheer + thick fabric)
Disadvantages:
- Curtains move less smoothly on rods compared to tracks
- Not always ideal for very lightweight sheers
5. Adjustable Bracket
Adjustable brackets allow you to change the distance between the curtain and the wall.
Advantages:
- Great for thick curtains
- Useful if there is an obstacle behind the curtain (heater, radiator, wide window frame)
- High flexibility
Disadvantages:
- More expensive than standard brackets
6. Concealed or Recessed Bracket
These brackets are used when you want the curtain track to be hidden inside a false ceiling or a recessed channel.
Advantages:
- Very minimal and modern design
- Perfect for contemporary interiors
Disadvantages:
- Requires ceiling modification such as drywall or a recessed groove
7. Center Support Bracket
This bracket is used to support the middle of long rods or extended tracks.
Best for:
- Curtain rods or tracks longer than 200 cm
- Heavy or multi-layer curtains
Advantages:
- Prevents bending or sagging
- Increases durability and stability
Disadvantages:
- On curtain rods, center brackets prevent the curtains from sliding completely to one side
Which Bracket Is Best for Two-Tone Sheer Curtains?
✔ If you’re using a curtain track:
Double ceiling track bracket — the cleanest and most professional choice.
✔ If you’re using curtain rods:
Double rod wall or ceiling brackets depending on your installation location.
✔ If you want the room to look taller:
Ceiling bracket is ideal.
Conclusion
Installing two-tone sheer curtains in the living room is an elegant and practical way to improve your interior décor. By choosing the right colors, fabric, and installation method, you can create a bright, stylish, and cohesive atmosphere.
📞 Need Help?
Let us take care of the hard work while you sit back and relax.
📍 Serving: Austin, Round Rock, Cedar Park & more
📱 Call or Text: (737) 420-6992
🌐 Visit: https://lavahandyman.com