
Assembling Canopy and Tent Beds for Children’s Rooms
Canopy and tent beds for children not only provide a place for sleep and rest but also create a cozy, imaginative space that stimulates creativity and play. These beds, with their whimsical designs and safety features, have become one of the most popular choices for parents and children. Proper assembly is crucial, as incorrect installation can pose safety risks and reduce the bed’s durability. This guide covers types of canopy beds, material selection, safety tips, step-by-step assembly, room design ideas, and maintenance.
Part 1: Importance of Canopy and Tent Beds
1. Creating a Private and Cozy Space
A canopy or tent bed provides a private area for children that can be used for studying, playing, or resting. This space enhances the child’s sense of security and independence.
2. Stimulating Creativity and Play
Canopies and tents turn the bed into part of the child’s play environment. Kids can personalize the space with toys, books, or decorations, fostering imagination and creativity.
Assembling Canopy and Tent Beds for Children’s Rooms
3. Aesthetic Appeal and Room Decor
These beds add charm to a child’s room with fantasy, cartoon, or modern designs. Various colors and themes can match the child’s personality and room decor.
4. Multi-Functional Use
Many canopy beds come with drawers, shelves, or additional storage, helping parents keep the room organized while maximizing space.
Part 2: Types of Canopy and Tent Beds
1. Classic Canopy Beds
These beds feature a wooden or metal frame over which fabric or canopy is draped. They are easily decorated and ideal for young children.
2. Play Tent Beds
These often include cone-shaped, tunnel, or castle-like tents over the bed. Children can play or rest inside, making them great for imaginative play.
Assembling Canopy and Tent Beds for Children’s Rooms
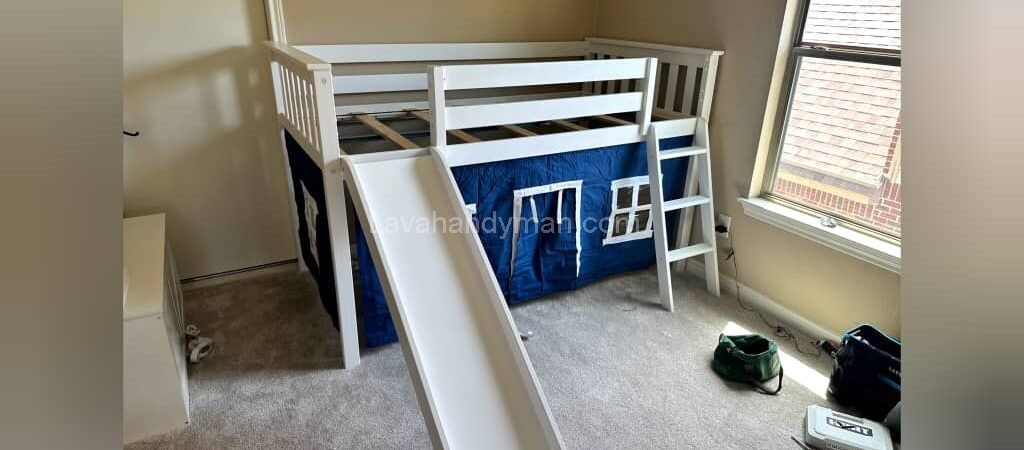
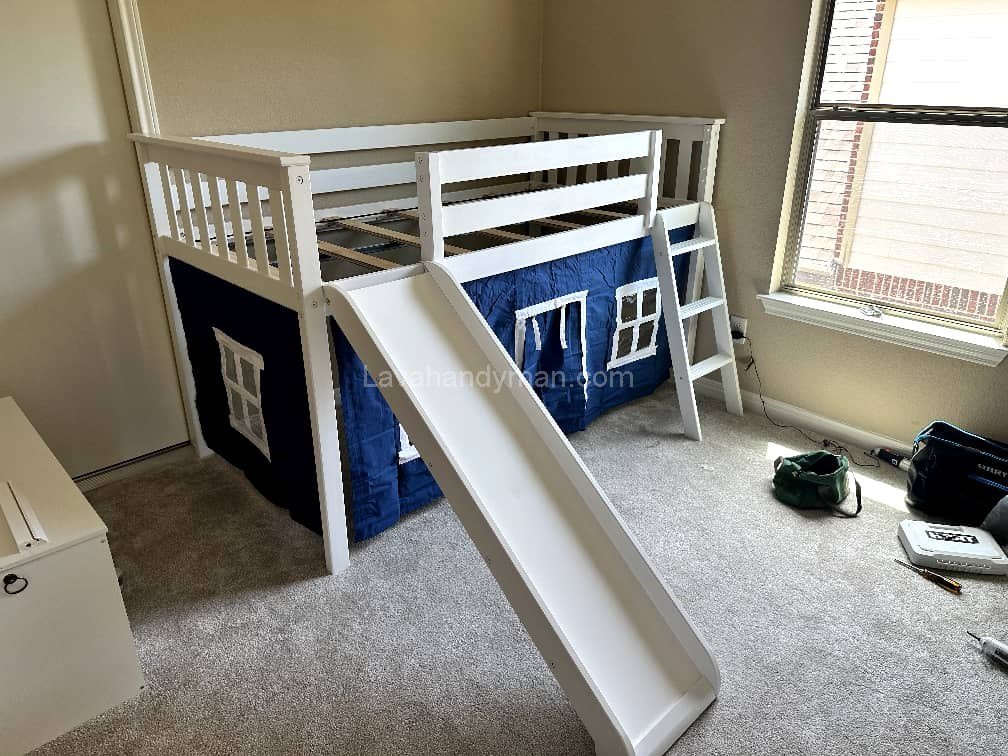
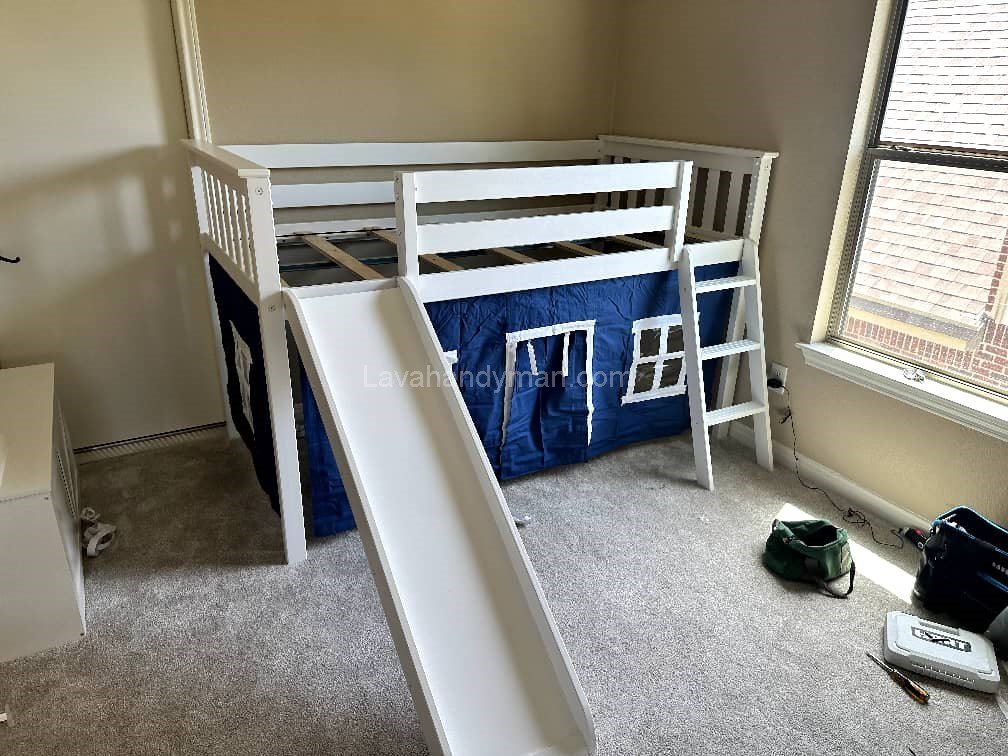
3. Loft or Bunk Canopy Beds
Combining a loft bed with a canopy is ideal for rooms with limited space. The area underneath can be used for storage or play, while the upper bed is covered with a canopy.
4. Modular Canopy Beds
Modular beds allow parents to reposition or change the canopy. This flexibility lets the bed grow with the child, and designs and colors can be easily updated.
Assembling Canopy and Tent Beds for Children’s Rooms
Part 3: Choosing the Right Materials
1. Wood
Natural wood, such as beech, pine, or oak, is popular for canopy beds. It increases durability and adds warmth to the room.
2. Metal
Metal beds are strong and suitable for highly active children. They are lightweight, durable, and compatible with modern designs.
3. Fabric and Canopy
The fabric should be:
- Non-toxic and washable
- Tear-resistant
- Attractive in color and design for children
Assembling Canopy and Tent Beds for Children’s Rooms
Part 4: Safety Tips Before Assembly
- Check all parts: Ensure every bed and canopy component is present and undamaged.
- Use proper tools: Screwdrivers, wrenches, and other recommended tools are essential.
- Prepare the workspace: Assemble the bed on a flat, clean surface.
- Remove hazards: Keep packaging debris and sharp objects away.
- Check standards: Ensure bed height, frame strength, and canopy attachment are safe.
- Child safety: Make sure no sharp edges or loose parts are accessible to the child.
Assembling Canopy and Tent Beds for Children’s Rooms
Part 5: Step-by-Step Assembly
Step 1: Prepare Parts and Tools
Lay out all bed, canopy, and tent components. Tools needed include screwdrivers, wrenches, and a plastic mallet.
Step 2: Assemble the Main Frame
- Attach the bed’s side and end panels as instructed.
- Partially tighten screws to allow for final adjustments.
Step 3: Install Legs and Upper Frame
- Secure the legs and ensure stability.
- If the bed has an upper frame for the canopy, install it according to instructions.
Step 4: Attach Canopy and Tent
- Drape the canopy or tent over the frame.
- Secure with screws or clips to prevent slipping.
- Ensure the fabric can be easily removed for cleaning.
Step 5: Final Check and Testing
- Fully tighten screws without over-tightening.
- Test stability by gently pressing on the bed.
- Ensure no sharp or loose parts remain and the canopy is secure.
Assembling Canopy and Tent Beds for Children’s Rooms
Part 6: Room Design Tips
1. Color and Theme Coordination
Coordinate the canopy or tent with the room’s color scheme and the child’s interests. Bright and playful colors enhance the room’s ambiance.
2. Utilize Under-Bed Space
The space under the bed can be used for play, storage, or shelves, making the room organized and efficient.
3. Lighting and Ventilation
Place the bed where it receives adequate natural light and airflow to ensure comfortable sleep.
4. Play Space
The tent can double as a play area, giving the child a safe, private space for activities.
Assembling Canopy and Tent Beds for Children’s Rooms
Part 7: Maintenance and Care
- Regularly check screws and connections.
- Clean the bed and canopy with a soft cloth and non-toxic cleaner.
- Prevent jumping on the bed or placing heavy objects on it.
- Repair or replace damaged parts promptly.
- Wash the canopy or tent regularly to maintain hygiene and freshness.
Part 8: Additional Safety Tips
- Keep bed height moderate to reduce fall risk.
- Maintain a safe gap between frame and tent fabric.
- Ensure all fabrics and clips are firmly secured.
- Avoid placing the bed near windows or dangerous objects.
Assembling Canopy and Tent Beds for Children’s Rooms
Step-by-Step Guide to Assembling a Children’s Bed
This step-by-step guide applies to standard children’s beds, including simple, loft, bunk, and canopy beds. Following these instructions ensures a safe, stable, and comfortable bed for your child.
Assembling Canopy and Tent Beds for Children’s Rooms
Step 1: Prepare the Workspace and Parts
- Unpack the bed and lay all parts on a flat surface.
- Check that all components are included according to the instruction manual:
- Side and end panels
- Bed legs
- Ladder or steps (for loft/bunk beds)
- Guardrails and safety barriers
- Screws, washers, and included tools
- Clear the workspace of sharp objects or obstacles.
- Prepare the necessary tools: screwdriver, wrench, and a plastic mallet (and drill if required).
Assembling Canopy and Tent Beds for Children’s Rooms
Step 2: Assemble the Main Frame
- Connect the bed’s side and end panels as per the instructions.
- Partially tighten screws to allow for final adjustments.
- Ensure the frame is level and properly aligned.
Step 3: Install the Legs
- Attach the legs in their designated positions.
- Confirm that the legs are stable and the bed does not wobble.
- Adjust leg height if the bed has adjustable legs.
Step 4: Install Guardrails
- Attach guardrails and safety barriers according to the manual.
- Ensure the gaps between rails are safe (usually less than 5 cm / 2 inches) so the child cannot get stuck.
- Tighten screws and check that rails are secure.
Assembling Canopy and Tent Beds for Children’s Rooms
Step 5: Attach Ladder or Steps
- Secure the ladder in its designated position.
- Check the angle to ensure it is not too steep.
- Each step must be stable and non-slip.
- For bunk/loft beds, make sure the ladder is firmly attached to the frame.
Step 6: Install Slats and Mattress
- Place the slats (bed boards) in their designated slots and ensure they are secure.
- Put the appropriately sized mattress on the slats.
- Press gently on the bed to check for any wobbling.
Assembling Canopy and Tent Beds for Children’s Rooms
Step 7: Attach Canopy or Tent
- Install the canopy frame on the bed.
- Place the fabric or tent over the frame and secure it with clips or screws.
- Make sure the fabric is tightly secured and cannot be easily removed by the child.
Step 8: Final Check
- Fully tighten all screws, but avoid over-tightening to prevent damage to wood or metal.
- Test the bed by gently pressing on different areas to ensure stability.
- Ensure no sharp edges, loose parts, or leftover tools remain.
Assembling Canopy and Tent Beds for Children’s Rooms
Step 9: Safety Tips
For canopy beds, use non-allergenic, washable fabrics.
Choose bed height appropriate for the child’s age.
Ensure guardrails and safety barriers are secure and up to standard.
The gap between mattress and guardrails should be less than 2.5 cm (1 inch).
Types of Brackets and Their Uses in Assembling a Children’s Bed
Brackets are metal or plastic components used to connect, reinforce, and stabilize parts of beds and furniture. Choosing the right bracket increases the strength, stability, and safety of the bed.
Assembling Canopy and Tent Beds for Children’s Rooms
1. L-Bracket
- Shape: Resembles the letter L
- Use: Connects two pieces of wood or metal at a 90-degree angle
- Advantages:
- Simple and inexpensive
- Quick and secure installation
- Example: Attaching legs to the bed frame or guardrails
2. T-Bracket
- Shape: Resembles the letter T
- Use: Connects a vertical piece to a horizontal piece, ideal for weight-bearing points
- Advantages:
- Distributes load evenly
- Strong at critical points
- Example: Attaching safety rails or bed supports
Assembling Canopy and Tent Beds for Children’s Rooms
3. U-Bracket / Corner Bracket
- Shape: Resembles the letter U
- Use: Stabilizes pieces at corners or in a frame structure
- Advantages:
- Prevents bending or sliding
- Secures legs and corners
- Example: Attaching bed legs or corner frames
4. Z-Bracket
- Shape: Resembles the letter Z
- Use: Creates a gap or height difference between two pieces
- Advantages:
- Suitable for multi-level beds or drawers
- Flexible design options
- Example: Installing a shelf or second mattress in a bunk bed
5. Hinge / Pivot Bracket
- Shape: Movable or hinged
- Use: Connects parts that need to open or fold
- Advantages:
- Allows movement or folding
- Ideal for multifunctional or foldable beds
- Example: Space-saving beds or guest beds
Assembling Canopy and Tent Beds for Children’s Rooms
6. Flange Bracket
- Shape: Flat plate with multiple holes for screws
- Use: Attaches parts to flat surfaces or mounts on walls
- Advantages:
- Provides strong support
- Can bear heavy weight
- Example: Securing the bed to a wall or attaching a canopy
7. Adjustable Angle Bracket
- Shape: Has an adjustable hinge
- Use: Connects pieces at a custom angle
- Advantages:
- Flexible design
- Suitable for modular or custom beds
- Example: Loft beds or beds with curved structures
Assembling Canopy and Tent Beds for Children’s Rooms
Important Tips for Using Brackets
Safety: Ensure no sharp edges or protruding screws remain accessible to the child.
Material: Metal (steel or aluminum) is recommended for maximum strength.
Size and thickness: Must match the bed’s weight and the child’s safety requirements.
Installation points: Use brackets at key points like corners, legs, and guardrails.
Proper screws and tools: Tighten screws securely to prevent wobbling.
Assembling Canopy and Tent Beds for Children’s Rooms
Conclusion
Canopy and tent beds provide children with a unique, cozy, and imaginative sleeping environment. Proper assembly, high-quality materials, adherence to safety standards, and regular maintenance ensure the bed is safe, comfortable, and durable. Thoughtful room design and coordination with the child’s preferences create a healthy, appealing, and magical environment for both children and parents.
📞 Need Help?
Let us take care of the hard work while you sit back and relax.
📍 Serving: Austin, Round Rock, Cedar Park & more
📱 Call or Text: (737) 420-6992
🌐 Visit: https://lavahandyman.com
