Mounting a Large TV Made Easy: Tools, Steps, and Safety Guidelines
Introduction
Mounting a large TV on the wall not only enhances the aesthetics and organization of your living space but also elevates your overall viewing experience. However, if not done correctly, it can lead to costly and even dangerous outcomes. In this comprehensive guide, we’ll walk through every step of mounting a large TV safely and effectively — from selecting the right location and wall bracket to cable management and safety precautions.
1. Choosing the Right Mounting Location
1. Ideal Height:
The center of the screen should align with your eye level when seated — typically around 110–130 cm (43–51 in) from the floor.
2. Ambient Lighting:
Avoid placing the TV opposite windows or direct light sources. Glare can reduce picture quality.
3. Access to Power & Ports:
Ensure outlets and ports (HDMI, USB, Ethernet, etc.) are easily accessible behind the mounting area.
4. Wall Type & Strength:
The wall must be structurally capable of supporting the TV and mount. Drywall, brick, or concrete each has different considerations for installation.
Mounting a Large TV Made Easy: Tools, Steps, and Safety Guidelines
2. Pre-Installation Checks
- TV Size and Weight: Needed to select the correct mount and determine wall capacity.
- Mounting Standard (VESA): The spacing between screw holes on the back of the TV must match the bracket (e.g., VESA 400×400 mm).
- Cable/Liner Detection: Use a stud finder or cable detector to ensure there are no hidden pipes or electrical wires where you’ll drill.
3. Choosing the Right Wall Mount
| Mount Type | Features | Best Use Case |
|---|---|---|
| Fixed | Sits flush, no movement | Rooms with direct viewing angles |
| Tilt | Tilts up/down for glare reduction | Rooms with overhead lighting or higher walls |
| Full-motion | Swivels, tilts, extends | Multi-use spaces or off-center viewing |
Note: Your mount must support at least 20% more than the actual TV weight for added safety.
4. Tools & Equipment Needed
- Measuring tape & level (laser level preferred)
- Drill with suitable drill bits
- Stud finder
- Appropriate screws and wall plugs
- Screwdriver or socket wrench
- Mounting template (usually provided with the bracket)
- Cable management cover or raceway
- Power surge protector
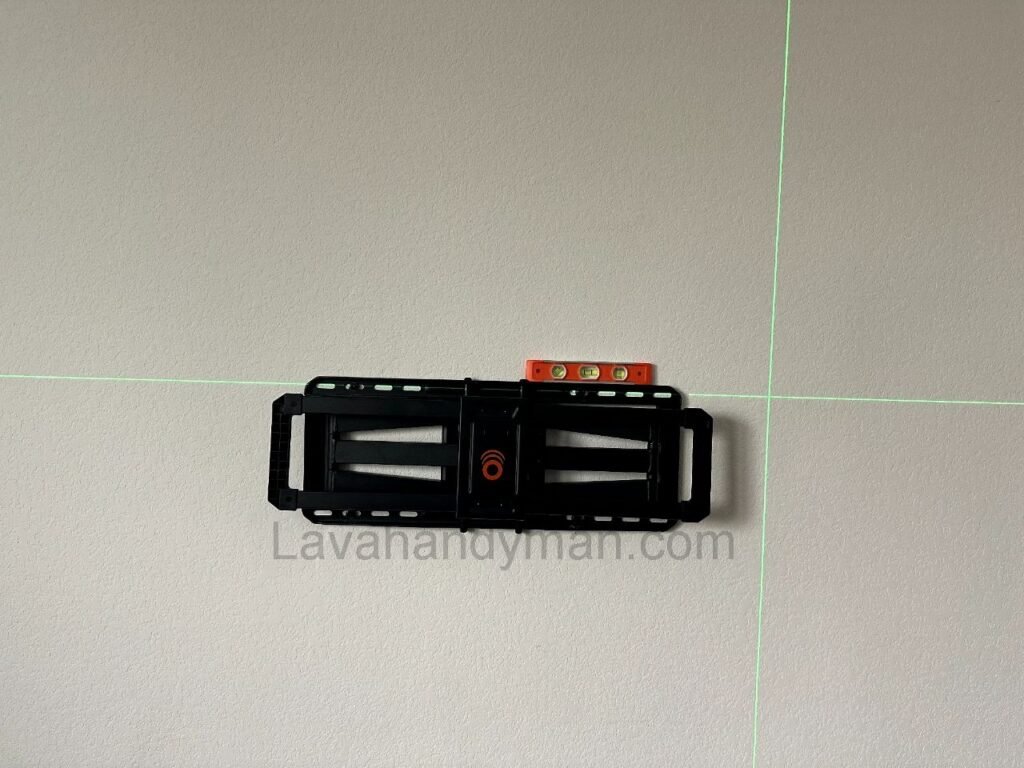
5. Preparing the Wall
- Mark the Mounting Height: Use a level to mark the center of the screen on the wall.
- Find Wall Studs: Especially important for drywall installations. Use a stud finder to locate vertical studs or reinforcements.
- Double-check Leveling: Attach the mounting template and verify it is perfectly level before drilling.
6. Installing the Wall Bracket
- Drill holes at the marked points.
- Insert wall anchors (if necessary — especially for concrete or brick).
- Secure the wall bracket using appropriate bolts.
- Test the bracket’s stability by applying slight pressure.
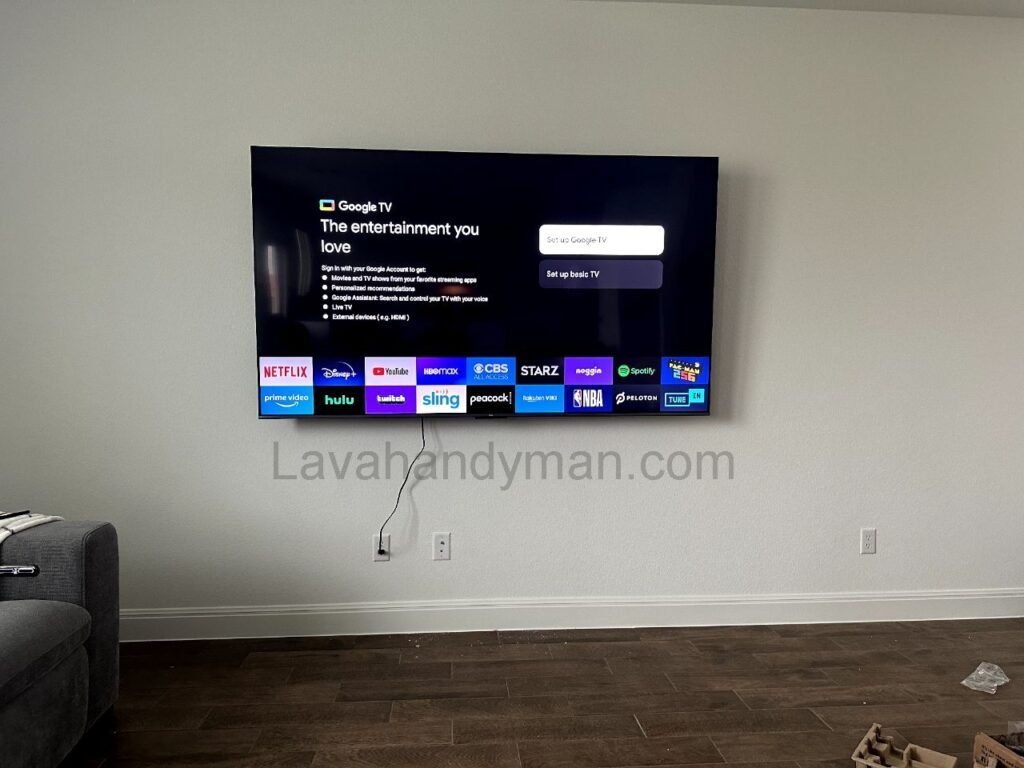
7. Mounting the TV on the Bracket
- Attach the mounting arms to the back of the TV using the screws provided.
- With assistance, lift the TV and hook it onto the wall bracket.
- Lock the TV in place (using screws or safety latches depending on the bracket design).
- Check that the TV is securely fixed and doesn’t shift.
8. Cable Management
- Use a cable raceway or cover: Helps organize and protect cables.
- High-quality HDMI cables: Required for large screens, especially 4K/8K TVs.
- Use a surge protector: To guard against voltage spikes or surges.
- Hide cables smartly: Route through wall or behind decorative covers to maintain a clean look.
9. Final Checks & Testing
- Verify power connection and that the TV turns on properly.
- Test HDMI, USB, antenna, and internet ports.
- Re-check TV alignment and leveling.
- Lightly nudge the TV to confirm it’s secure.
- Monitor for heat buildup after about one hour of use.
10. Important Safety Tips
- Never attempt to mount large TVs alone — always have someone assist.
- Never rely solely on drywall; always screw into studs or use proper anchors.
- Avoid installing above heat sources like radiators or fireplaces.
- Always use a surge protector for high-end TVs.
- For homes with children, install out of reach or enable child safety locks.
Conclusion
Proper wall-mounting of a large TV is a task that, when done right, improves both function and aesthetics. With careful planning, the right tools, and strict adherence to safety guidelines, you’ll enjoy:
- A sleek, modern look
- Improved viewing experience
- Secure installation without the risk of damage
If you’d like help choosing the right bracket, tools, or installation method — I’m here to assist.
📺 Step-by-Step Guide to Properly Wall-Mounting a Large TV
Mounting a large TV on the wall not only gives your living space a modern and clean look but also improves viewing comfort. However, to ensure safety and functionality, the installation must follow certain technical steps. Here’s a simplified and practical guide for wall-mounting TVs of 55 inches and above:
1. Choosing the Right Mounting Location
- Proper Height: The center of the screen should be at eye level when seated — generally between 110–130 cm (43–51 inches) from the floor.
- Viewing Angle: The TV should face your main seating area directly.
- Lighting Conditions: Avoid placing the TV opposite windows or under direct light to reduce glare.
- Accessibility: Make sure there is nearby access to a power outlet and any required ports (HDMI, USB, etc.).

2. Check Your Wall Type
- Drywall or Plasterboard: You must anchor the mount into wall studs (use a stud finder).
- Brick or Concrete: Requires a masonry drill bit and heavy-duty wall plugs.
- Always check for hidden pipes or wires before drilling.
3. Choosing the Right Wall Mount
- Fixed Mount: Simple, close-to-wall design with no movement.
- Tilt Mount: Allows up/down tilt to reduce glare.
- Full-Motion/Articulating Arm: Offers full swivel and extension — great for dynamic viewing angles.
- Ensure the mount matches your TV’s VESA standard (e.g., 400x400mm).
4. Tools & Equipment You’ll Need
- Power drill and appropriate drill bits
- Level (manual or laser)
- Screws, wall plugs/anchors
- Screwdriver or socket wrench
- Measuring tape and pencil
- Mounting template (if provided)
- HDMI cable, surge protector, cable organizer
- A helper (never lift a large TV alone)
5. Installing the Wall Bracket
- Measure and mark the mounting height with a level to ensure it’s straight.
- Drill pilot holes at the marked points.
- Insert wall plugs if needed.
- Secure the bracket firmly using screws or bolts.
- Double-check for levelness and stability.
6. Attaching the Mounting Arms to the TV
- Align the mounting arms with the screw holes on the back of the TV.
- Secure them with the provided screws — tighten them firmly but gently.
7. Mounting the TV on the Wall
- With assistance, lift the TV and hook or slide it onto the mounted wall bracket.
- Lock the TV into place using safety latches or screws as per the bracket’s design.
- Confirm that the TV is secure and level.
8. Managing the Cables
- Gently connect power and HDMI cables.
- Use cable raceways or covers to keep everything neat.
- Hide cables inside the wall if desired, using an in-wall cable kit.
- Always use a high-quality surge protector for safety.
9. Final Check & Test
- Turn on the TV and test picture, sound, and all connected ports.
- Re-check the leveling and make sure the TV doesn’t wobble.
- Monitor for any overheating after use.
⚠️ Important Safety Tips
Use only certified mounts and accessories for your specific TV model.
Never attempt to mount a large TV alone — always have someone help.
Do not mount solely on drywall without anchoring into studs.
Avoid installing above heat sources like radiators or fireplaces.
Use child-safety measures if kids are present in the home.
🧱 Types of Wall Mounts Suitable for Installing Large TVs
Mounting large TVs (55 inches and above) requires a strong, standard, and appropriate bracket. Choosing the right mount not only ensures the TV’s safety but also directly affects usability and the aesthetic appeal of your space.
Here are the most common types of mounts:
1. 🔹 Fixed Wall Mount
- Features: Keeps the TV fixed and flush against the wall.
- Advantages: Minimalist look, cost-effective, easy to install.
- Limitations: No movement or angle adjustment.
- Best For: Rooms where the TV faces the seating area directly and no angle adjustment is needed.
2. 🔹 Tilt Wall Mount
- Features: Allows vertical angle adjustment (usually up to 15 degrees).
- Advantages: Reduces glare, suitable for mounting higher on the wall.
- Limitations: Only vertical tilt adjustment.
- Best For: Mounting above fireplaces or on tall walls.
3. 🔹 Full-Motion / Articulating Mount
- Features: Moves in multiple directions: swivel left/right, extend/retract, tilt up/down.
- Advantages: Highly flexible, ideal for multiple viewing angles in a room.
- Limitations: More expensive and complex to install.
- Best For: Large rooms, corners, or multi-purpose spaces like open kitchens.
4. 🔹 Ceiling Mount
- Features: Mounted from the ceiling with adjustable height and angle.
- Advantages: Suitable for spaces without appropriate walls for mounting.
- Limitations: Requires a sturdy ceiling and skilled installation.
- Best For: Commercial spaces, cafes, conference rooms, or unique bedrooms.
5. 🔹 Recessed / In-Wall Mount
- Features: The TV is installed inside a wall cavity, flush with the wall surface.
- Advantages: Extremely sleek and modern look, minimal space usage.
- Limitations: Requires cutting into the wall and professional installation.
- Best For: Luxury designs and minimalist décor.
✅ Important Tips When Choosing a Mount:
Choose reputable brands with warranty and after-sales support.
Check the VESA standard (e.g., 400×400 mm).
The mount must support the TV’s weight with a safety margin.
Prefer mounts made of steel and rust-resistant materials.
Installation should be secure, level, and follow the TV manufacturer’s instructions.
At LavaHandyman.com, we don’t just help you understand TV tech — we also offer expert TV installation services, making sure your home entertainment setup looks and performs at its best.
📞 Need Help?
Let us take care of the hard work while you sit back and relax.
📍 Serving: Austin, Round Rock, Cedar Park & more
📱 Call or Text: (737) 420-6992
🌐 Visit: https://lavahandyman.com